Section 1 : What is RefTown? (Category ID: 6)
Section 2 : User Guide (Category ID: 41)
Section 2.1 : Getting Started (Category ID: 1)
Section 2.1.1 : Logging In and setting up your account (Category ID: 2)
Section 2.1.2 : Common Problems (Category ID: 15)
Section 2.1.3 : Common Items for ADs/Coaches (Category ID: 55)
Section 2.2 : Roster Functions (Category ID: 30)
Section 2.3 : Game/Match Functions (Category ID: 3)
Section 2.3.1 : Reading the games page (Category ID: 16)
Section 2.3.2 : Finding and viewing games/matches (Category ID: 4)
Section 2.3.3 : Accepting, Declining, or Approving games and assignments (Category ID: 5)
Section 2.3.4 : Availability Calendar and Scratching Schools (Category ID: 18)
Section 2.4 : Voting, Ballots, Quizzes, and Signups (Category ID: 46)
Section 2.5 : General Information and Tips (Category ID: 26)
Section 2.6 : Invoices and Finances (Category ID: 53)
Section 2.7 : Mobile App (Category ID: 67)
Section 3 : Administrator Guide (Category ID: 7)
Section 3.1 : General Tips and Suggestions (Category ID: 43)
Section 3.2 : Setup and Configuration (Category ID: 39)
Section 3.2.1 : Basic Information (Category ID: 52)
Section 3.2.2 : Email Reminder Options (Category ID: 49)
Section 3.2.3 : Officials Directory Options (Category ID: 50)
Section 3.2.4 : School Directory Options (Category ID: 51)
Section 3.2.5 : Game and Assignment Settings (Category ID: 34)
Section 3.2.6 : Finances (Category ID: 37)
Section 3.2.7 : Interactive Forms (Category ID: 36)
Section 3.3 : Association Maintenance (Category ID: 8)
Section 3.3.1 : Officials (Category ID: 10)
Section 3.3.2 : Payors/Location/Teams (schools) (Category ID: 11)
Section 3.3.3 : Payor/Location/Team (school) Contacts (Category ID: 32)
Section 3.3.4 : Game/Match Properties (Category ID: 12)
Section 3.3.5 : Printing and Exporting Information (Category ID: 27)
Section 3.3.6 : Access Permissions (Category ID: 28)
Section 3.3.7 : Email Features (Category ID: 31)
Section 3.3.8 : Driving Distances (Category ID: 54)
Section 3.4 : Game Entry (Category ID: 19)
Section 3.5 : Making Assignments (Category ID: 20)
Section 3.5.1 : Assigned by Assignor (Category ID: 21)
Section 3.5.2 : Automatic Assigning (Category ID: 44)
Section 3.5.3 : Self-Assignment / Assignment Reqeust (Category ID: 22)
Section 3.5.4 : Focused Assigning for One Official (Category ID: 72)
Section 3.6 : Finances (Category ID: 47)
Section 3.6.1 : PayPal / Venmo Payouts (Category ID: 57)
Section 3.6.2 : W9's and 1099's (Category ID: 59)
Section 3.6.3 : Direct Deposits (Category ID: 61)
Section 3.6.4 : Travel / Mileage (Category ID: 63)
Section 3.6.5 : Stripe Payments (Category ID: 69)
Section 3.7 : Voting, Ballots, Quizzes, and Signups (Category ID: 45)
Section 3.8 : Custom Content (Category ID: 23)
Section 3.9 : Posting and Managing Documents (Category ID: 25)
Section 3.10 : FAQ (Category ID: 40)
Section 3.10.1 : Assignment Options (Category ID: 29)
Section 4 : School/Team Administrator Guide (Category ID: 65)
An overview of some of RefTown's features | ||
| Article ID:117 | Posted:4/22/2008 1:41:45 AM | Updated:3/2/2025 8:03:45 PM |
RefTown will revolutionize the way you do business We service multiple organizations of various sizes from less than 30 to several hundred across all major sports. Our highly customizable service can be adapted to serve nearly any scheduling need. RefTown is the most complete and most comprehensive officials organization management package available Our features cover not only game assigning but can also provide a full web presence for your organization. We can be your only web site. Our features include a full set of communications options; election, survey, test, and signup functionality; documents archives, payroll calculations, customized interactive forms, and more. We are committed to providing reliable, user-friendly functionality with world-class customer support RefTown is designed with a highly intuitive and consistent theme and usage model throughout the site. Most functions have rollover pop-ups that guide you through the use of the site, eliminating the need for highly technical documentation. RefTown is proven reliable and effective Organizations that use RefTown have reduced their number of assigning errors as a result. In well over 1,000,000 assignments across multiple organizations representing multiple sports, there have been no missed assignments due to an error on the site. The officials who use the site find many benefits from easily locating schools to clear and efficient communication of their assignments and other information. RefTown adapts to your needs If you have features you'd like to see on RefTown, feel free to contact us and request them. We're frequently adding features based on the requests of customers. All new features are available for all customers to use at no additional charge. RefTown guarantees you'll be satisfied We are so confident that you'll like what we offer that we'll give you a free, fully functional, no-obligation trial and will not ask for payment until you are satisfied. When you choose RefTown, you can be confident that it will make big improvements to your organization. | ||
RefTown Game and Assignment Related Features | ||
| Article ID:209 | Posted:3/2/2015 10:02:15 PM | Updated:3/3/2015 12:26:17 AM |
| ||
RefTown Directory Features | ||
| Article ID:210 | Posted:3/2/2015 10:20:58 PM | Updated:3/2/2015 11:49:36 PM |
| ||
RefTown Financial Features | ||
| Article ID:211 | Posted:3/2/2015 10:59:49 PM | Updated:3/2/2015 11:49:44 PM |
| ||
RefTown Information Distribution and Collection Functions | ||
| Article ID:212 | Posted:3/2/2015 11:35:01 PM | Updated:3/2/2015 11:44:47 PM |
| ||
RefTown Additional Functions and Services | ||
| Article ID:213 | Posted:3/3/2015 12:01:06 AM | Updated:3/3/2015 12:18:08 AM |
In addition to RefTown primary (game and game assignment) function and secondary (general information functions), we also provide a variety of other features and services.
| ||
What do I need to begin using RefTown? | ||
| Article ID:15 | Posted:4/24/2007 11:29:33 PM | Updated:4/2/2015 11:50:36 PM |
All you need to do to start using RefTown is provide an organization name, abbreviation, at least one user/administrator with an email address, and what sport or sports your organization covers. You can contact us at webmaster@reftown.com or you can fill out our question/feedback form at https://www.reftown.com/rt_feedback.asp. We also offer to import your initial data for you for no charge—rosters, configuration assistance, etc. We aim to help you start using RefTown with as little effort as possible. | ||
How much does RefTown cost? | |||
| Article ID:14 | Posted:4/24/2007 11:23:30 PM | Updated:9/23/2025 12:32:01 AM | |
BASE SUBSCRIPTION
Note: All current website features and functions, except for direct deposit and 1099 services, are included in base price. Includes 40 text message units (160 characters per unit) per official. Extra text messages units available at $40 per 2000 units. DIRECT DEPOSITS, for subscribed officials organizations (effective 3/1/2025)
DIRECT DEPOSITS, for associated schools/districts/leagues/etc.
PAYPAL / VENMO
| |||
General Tip Sheet on Using RefTown | ||
| Article ID:164 | Posted:11/25/2009 4:38:34 PM | Updated:4/8/2024 3:21:56 PM |
USERNAME and/or PASSWORD RETRIEVAL
ACCOUNT LOGIN On RefTown, you will generally have only one login username/password no matter how many organizations you are part of. When you log in, RefTown will automatically identify all accounts you have access to by searching all rosters for the email address associated with your login credentials. Logging into RefTown:
You will now be logged into RefTown. Note the red box at the top and near the right that lists your name and the currently active account. Moving between accounts/associations/sports/schools:
RefTown will also remember the last selected account and will select that account first upon your next login, usually taking you directly to one of your in-season sports. If you are affiliated with multiple organizations and do not see all of them in your accounts list, the email addresses on the accounts are not the same. You can "link" them together by updating your email addresses to match (or by having any administrator do so on your behalf). UPDATING YOUR PROFILE Changing your Contact Information (address, email address, phone, etc.):
Note: If you change your email address, it may cause a new username and password to be generated and emailed to you depending on various security criteria. An existing username will remain with the old email address as long as some account still lists that username. YOUR GAMES Viewing your games:
After Logging in, you have a several ways to get to your games. A few of them are:
You can optionally use the "Search for Games" filter on the games page to refine the listing of games to only show one subset of games (V, JV, etc) at a time. Confirming your games: Once you've reached a listing of your games, you' may need to accept/approve the games/assignments:
After submitting, you'll be taken to a page that will summarize your responses and, depending on the organization's configuration options, an email will be sent to the assignor(s) with the details of the responses. UPDATING YOUR USERNAME OR PASSWORD Changing your Username: After logging in:
If the entered username is available, it will be changed immediately; otherwise, you'll be informed that it is not available. Changing your Password: After logging in:
OFFICIALS... Officials will need to update several more pieces of information.
COACHES/ADs...
| ||
How do I enter information in my availability calendar? | ||||||||||||||||
| Article ID:53 | Posted:4/25/2007 11:34:11 PM | Updated:5/12/2023 9:46:41 PM | ||||||||||||||
Availability information is entered through "Schedules" -> "Availability" You have two ways that availability information can be entered.
If both are entered, the specific date information is used. If you have accounts on Reftown with more than one organization, you have two levels where you can ether availability information
If you only belong to one organization, the global options will not appear. The system will use the first information it finds by looking at each source in the following order:
The priority is determined on a date-by-date basis. If in in doubt about how the multiple calendars work, use your organization's date specific calendar. To enter availability information for specific dates for the current organization:
To enter availability information for specific dates for all organizations:
To enter availability information by day of the week for the current organization:
TIPS ON ENTERING AVAILABILITY INFORMATION To block an entire day/date
There are also additional slots for up to 2 time windows of availability. To access the additional slots, click the + button after the last visible time slot. If any of the time windows indicates you are available for a given time, you will be considered available for that time. Examples:
If you organization use the driving distance feature, each time slot will have a zip code box that you can use to specify where you will be starting from at that time. If you do not enter a zip code in these boxes, your general early/late zip codes will be used or, if those are not entered, your home zip code will be used. For example, you could put a zipcode for the east side of your city for a time slot from 3pm to 6pm and then a zip code on the west size of town from 6pm to 9pm to indicate you start in the east side of your town but move to the west side later in the evening. You can have up to 2 different locations each day. There are a 4 buttons at the top of the calendar that may assist you in filling out your availability. You can use them to make all days/dates as available, not available, or clear all information, or replicate the first 7 days of the month to the rest of the month. Use this if most of your availability is the same and then fill in the boxes that are different. Each date/date box has a button to delete that box's information....it is a small red X at the top of each date's box on the calendar. Updates to your availability calendar take effect immediately. However, it is possible that assignments that are made but not yet published might be in conflict with availability data entered after the assignment was initially entered. The assignor also has the option to override the availability and assign you in conflict with your availability. It is also possible, in the event of a rescheduled game, for you to be assigned to a game in conflict with your availability. The assignor may, at the time it is rescheduled, choose to leave you on that game or may choose to reassign it to someone else. | ||||||||||||||||
How do I get a username or a password? | ||
| Article ID:1 | Posted:4/19/2007 11:34:12 PM | Updated:6/17/2025 4:16:49 PM |
To get a username and password, your administrator must have entered your account with an email address in the system.
To request a username and/or password:
The officials roster and schools roster of each association on RefTown will be searched for the entered email address.
To set/reset your password:
| ||
How do I log in? | ||
| Article ID:3 | Posted:4/20/2007 12:07:32 AM | Updated:9/13/2023 11:19:48 AM |
There are two ways to log in:
This will take you to the selected organization. | ||
How do I change my username? | ||
| Article ID:4 | Posted:4/20/2007 12:16:10 AM | Updated:11/2/2018 12:12:10 AM |
If your selected username is available, it will be changed immediately. If it is not available, you'll be informed that it is already taken. Note that your username is tied directly to a single email address. Through that username, you'll have access to all accounts that list that email address. | ||
How do I change my password? | ||
| Article ID:5 | Posted:4/20/2007 12:19:21 AM | Updated:11/2/2018 12:14:57 AM |
| ||
Does my username have to be my email address? | ||
| Article ID:67 | Posted:4/27/2007 12:43:58 AM | Updated:6/21/2010 11:28:45 PM |
No, by default your email address is chosen as your username. However, you can modify your username to be anything you want as long it is not already in use. Note, however, that your username will be tied directly to one email address and will give you access to any accounts that list that email address. | ||
What roster information can an official or school update themselves? | ||
| Article ID:69 | Posted:4/27/2007 12:53:25 AM | Updated:11/3/2010 12:16:48 AM |
· Officials or schools/teams can update their contact information: mailing address, physical address, phone numbers, email addresses, fax numbers, and pager numbers. · A school/team can also enter a website address. · Neither officials nor schools are permitted to modify their names—they must contact an administrator to have their name changed. | ||
What can I use for my username and password? | ||
| Article ID:71 | Posted:5/8/2007 1:45:29 PM | Updated:11/3/2010 12:16:12 AM |
Your username can be just about anything you like. By default, it is set to your email address, but you can change it. It can include letters, numbers, spaces, and punctuation. The "case" of the letters in your username DOES NOT matter. If your username is or resembles an email address, it must be your own email address. Your password can also be just about anything you like. By default, it is set to random letters and numbers, but you can change it. It can include letters, numbers, spaces, and punctuation. The "case" of the letters in your password DOES matter. A password must be at least 6 characters. | ||
RefTown says my account is locked when I try to login. | ||
| Article ID:75 | Posted:5/8/2007 2:27:02 PM | Updated:11/3/2010 12:15:17 AM |
This happens when there are too many attempts to log into your account with an incorrect password. When there are more than 5 login attempts in a row with an incorrect password, the account will be locked. When your account is locked, you will not be able to access the account for 30 minutes. You should request that your password be sent to you and try again once you have received your correct password and have waited 30 minutes after your last unsuccessful try. | ||
Moving between linked accounts. | ||
| Article ID:136 | Posted:5/26/2008 10:47:59 AM | Updated:5/8/2022 9:00:05 AM |
Accounts are connected through email addresses. You can have access to all of your accounts with a single login (1 username, 1 password). Each username is connected to a single email address and to all accounts that list that address on the roster. Once you log in, you can switch between all accounts having that email address. To switch accounts
Notes:
| ||
IMPORTANT NOTE for Yahoo Users | ||
| Article ID:185 | Posted:12/7/2010 2:17:41 AM | Updated:9/4/2024 11:20:59 AM |
If you have a Yahoo email address, you will likely have difficulty in receiving emails from RefTown, particularly your username/password email. Yahoo, and only Yahoo, actively forces emails from our site into the junk/spam folder. We've yet to find a case of a missing username/password email on Yahoo that is not found there. Here are two different sets of instructions to configure Yahoo to allow our emails through (they both do the same thing, just two different approaches, ):
See the article referenced below on having your username/password sent again if needed. We apologize for this problem but the emails are making it to Yahoo but not to the inbox. We've appealed to Yahoo on this issue and they refuse to address this problem. Complaints to Yahoo, from you, may help with this issue for future users. Feel free to contact us if you need assistance. | ||
Login Options: Remember Me & Keep Me Logged In | ||
| Article ID:217 | Posted:10/15/2016 11:49:10 PM | Updated:8/1/2025 9:07:18 PM |
"Keep me Logged In": When returning to the site after being away, the "Keep me Logged In" feature only provides basic official-level or school/team level access. It does not enable administrative or assignor access or any other elevated permissions level. A user with access to anything more than basic permissions will still be logged in (partially), but only with the same permissions as any other official. The primary reason for that is security. As a result, the "Keep me Logged In" is more of a benefit for officials than assignors. It can, however, be of some benefit to assignors. You can look up names on the roster and such without full access. For access to some functions, even basic level users will need to provide their password to proceed. For example, any profile edits will require a password-based login. An indication that you've used the "Keep me Logged In" option is the yellow triangle by your name in the top right:
If you see that yellow triangle and wish to enable any extra permissions you may have, click on it, then click "Full Login" in order to provider your password. "Remember Me": This will cause your browser to remember your username but not your password. Other features from your browser may remember your password for you. | ||

Mobile app not finding all organizations | ||
| Article ID:251 | Posted:12/14/2020 3:50:44 PM | Updated:12/14/2020 3:57:00 PM |
The RefTown Mobile app only uses the primary email address to associate your accounts together. It accesses accounts where your first email address is the one matching the login info. The website will log you in using any of the three email addresses listed on an account. If you are not seeing one or more organizations in the app, you'll need to edit your profile to ensure the email address being used to log into the app is listed as your primary email address in each account. To fix it�
You should then be able to access all organizations within the app. | ||
How to Enable JavaScript | ||
| Article ID:16 | Posted:4/24/2007 11:32:32 PM | Updated:6/21/2010 10:45:50 PM |
To function properly, RefTown functions (particularly menus) require that you enable javascript in your web browser. Internet Explorer 7.0 & 8.0
iPhone
Internet Explorer 6.x
Firefox 2.x & 3.x
Safari
| ||
How to Enable Cookies | ||
| Article ID:17 | Posted:4/24/2007 11:33:57 PM | Updated:11/30/2016 10:59:30 AM |
To function properly, RefTown requires that you enable cookies in your web browser. Enabling cookies allows the website to recognize you as you browse through the site. For most functionality, only "Session" cookies are required. These are automatically deleted every time you close your browser. In some browsers, you can enable only session cookies separately from normal cookies. To have the site remember your username and association, you will need "First-Party" cookies. Reftown never requires cookies called "Third-Party" cookies. Microsoft Edge
Microsoft Internet Explorer 7, 8, 9, 10, & 11
Chrome
iPhone
Firefox
Safari
| ||
RefTown says my account is locked when I try to login. | ||
| Article ID:75 | Posted:5/8/2007 2:27:02 PM | Updated:11/3/2010 12:15:17 AM |
This happens when there are too many attempts to log into your account with an incorrect password. When there are more than 5 login attempts in a row with an incorrect password, the account will be locked. When your account is locked, you will not be able to access the account for 30 minutes. You should request that your password be sent to you and try again once you have received your correct password and have waited 30 minutes after your last unsuccessful try. | ||
When I click on an email address on RefTown, I get an error message or it opens the wrong program?
(Configuring RefTown to use your preferred email program) | ||
| Article ID:81 | Posted:5/8/2007 3:18:07 PM | Updated:8/9/2025 7:50:12 AM |
Becasue various email programs are accessed differently, RefTown supports a few methods when clicking on email address links. If you have never clicked on an email address on RefTown, we will ask you what method you prefer. You have the chose of having RefTown transfer the email address to your system's default email program or to one of several web-based email services: AOL Webmail, GMail, MSN/Hotmail/Windows Live, or Yahoo. When you click on an email address or email icon on RefTown, it attempts to transfer the email address to the email application as you have selected. If you receive an error message, it is likely that your computer is not configured correctly to allow you to click on an email address. To see what this is set to for Internet Explorer:
You can change your preferred email application that RefTown will attempt to use by editing your profile's global preferences. This has usually taken care of any issues related to clicking on email addresses on the website. It may be set to run a program you don't have or don't use. This is a universal setting that should apply to every website, not just RefTown. If you use a web-based email service, you will need to contact your provider to determine how to configure your browser to use clickable email addresses. | ||
Calendar items do not transfer to Outlook properly. | ||
| Article ID:78 | Posted:5/8/2007 2:56:00 PM | Updated:11/2/2018 12:13:34 AM |
There are two file formats in common use for transferring calendar data between various programs. RefTown supports both of the common formats: vCalendar 1.0 and vCalendar 2.0. You may need to change a setting in RefTown to have it export the correct version. You can select the other main format under:
Are the times of your games transferring incorrectly? RefTown supports the automatic padding of start times with a pregame time and/or a travel time. You change the amount of time used in each case as follows:
| ||
I'm on AOL and emails sent by RefTown to AOL addresses always generate delivery error messages....why? | ||
| Article ID:192 | Posted:9/21/2011 8:33:21 AM | Updated:11/2/2018 12:14:05 AM |
WHAT IS HAPPENING... RefTown normally sends all emails out in a form that is commonly used by mailing lists. The email headers are set to show the email was sent by reftown.com on behalf of the person who sent it. From: john.doe@aol.com Sender: mailer@reftown.com Repliy-To: john.doe@aol.com When such an email is also sent to either another aol user or copied to the person who sent it, AOL's email system sees that it is "From" an aol address and "To" an aol address. AOL determines that it must be a bogus email since it knows it didn't come from an AOL system....they ignore the "Sender" designation. As a result, AOL generates a bounce message. In most cases, the original email is actually delievered and the bounce message is just a nussaince. HOW TO PREVENT IT... RefTown offers an option to each user to change how emails are sent that they trigger....they may elect to have the emails sent simply "From" mailer@retown.com. The emails are still sent in such a way that replies will be directed to the actual sender but it will not indicated that it is from AOL. To set this option...
All future emails will then be sent with the headers indicating it was sent by RefTown From: mailer@reftown.com Sender: mailer@reftown.com Repliy-To: john.doe@aol.com EFFECT OF THIS OPTION... Emails in the recipients inbox will not show as "From" the person who sent it but from "RefTown User (for John Doe)". | ||
Moving between linked accounts. | ||
| Article ID:136 | Posted:5/26/2008 10:47:59 AM | Updated:5/8/2022 9:00:05 AM |
Accounts are connected through email addresses. You can have access to all of your accounts with a single login (1 username, 1 password). Each username is connected to a single email address and to all accounts that list that address on the roster. Once you log in, you can switch between all accounts having that email address. To switch accounts
Notes:
| ||
Using the Game Search Form | ||
| Article ID:222 | Posted:10/16/2016 12:42:20 AM | Updated:4/26/2018 9:37:06 AM |
On various game-related pages, you will find a fairly powerful search form. You can search/filter the various pages/reports based on nearly all game criteria: Date, Status, ID #, nature of the game, the participants of the game (by name or by categorizations), by administrative ownership, or by the text in the various comment fields. When execution those searches, it is possible to select multiple items in each drop down list. However, to do so, you must first click the "Multi-Search" button at the top in order to enable that functionality. This is not on by default because it can put a large burden on some user's internet browsers, making the loading of the related pages very slow, even if they were not intending to use the search. If it works well on all of the systems you normally use, you can enabled it permanently under your profile options. Also, when using the game search, you'll have the option of formatting the output (on some pages) in one of several formats. Those formats include:
In most of the Grid-based formats, you have choose whether to include various game details. | ||
How do a find specific games? | ||
| Article ID:24 | Posted:4/25/2007 9:06:41 AM | Updated:4/26/2018 9:40:35 AM |
There are several ways to locate games/matches. The primary way to access games is through the Schedules - > Games/Matches page search form ("Search for Games/Matches"). Select the criteria of interest: date(s), schools, levels, leagues, etc. and then click "Search Now." Make sure to clear any field you do not wish to search on (e.g., your own name is selected by default under the officials field). Note that once you've searched for a set of criteria, the header of the games page will not only list the criteria searched with, but also will, for most fields, have a "Previous" and "Next" link. You can step a day at a time or a school at a time with these links. There are also other ways to locate certain categories of games/matches. Using the QuickLinks at the top of the Games/Matches page, you can access the most commonly used set of searches: today's game, tomorrow's games, etc. In addition, Assignors and Administrators can access schedules from the rosters. For each school/team on the roster, there may be several links available to take you to games/matches at that location, have that team as the home team, have that team as the away team, or all of the above. | ||
How do schools request games on RefTown? | ||
| Article ID:42 | Posted:4/25/2007 8:26:40 PM | Updated:9/17/2024 12:38:12 PM |
Go to "Schedules" -> "Game Request" (only available to schools and assignors). The interface for schools is the same as the assignor's interface (see the related article). The only difference is that the games requested by schools do not go directly to the schedule but into a requested games list where the assignor can choose to put them on the schedule or can delete the request. To enable this feature, go to:
| ||
How can games be added to RefTown? | ||
| Article ID:38 | Posted:4/25/2007 8:09:46 PM | Updated:5/20/2018 7:27:19 PM |
There are three ways to add games to the system:
| ||
Can I see who is assigned to other games? | ||
| Article ID:25 | Posted:4/25/2007 9:11:27 AM | Updated:4/26/2018 9:40:15 AM |
It depends on the settings chosen by your organization. By default, officials can only see who is working at games at the same location and on the same date as their own assignments. Other games will only show "Assigned" or "Unassigned" in place of the officials' names. Some organizations even choose to hide from officials the assignment status of games not assigned to the official. Some associations choose to reveal all assignments to all officials, but some enable the ability to see the assigned officials' names when searching for games by a specific date or within a certain number of days preceding a game. By default, schools/teams can not see the officials. There are options for an organization to reveal the officials names to the payor or to any team on a game. When the names are generally visible, the names can be hidden until the official accepts the assignment. | ||
Can schools see who is assigned to games? | ||
| Article ID:23 | Posted:4/25/2007 8:55:30 AM | Updated:4/26/2018 9:41:29 AM |
Yes, depending on the options chosen by the organization. By default, schools cannot see who is assigned to games/matches. Organizations have the following options, however:
Administrators can find these options under Association Configuration, "Games/Matches," then "School Options." | ||
How do I approve my school/team schedule? | ||
| Article ID:20 | Posted:4/24/2007 11:53:54 PM | Updated:4/26/2018 9:41:52 AM |
Go to "Schedules" -> "Games" then take the following steps: 1. By any game that says "Approve?," click the "Yes" button to confirm that the entry is correct or click "No" button if it is incorrect. 2. By any game that says "Cancel OK?," click the "OK" button to indicate you are aware that officials will no longer be sent to that event. 3. By any game that says "Postpone OK?," click the "OK" button to indicate you agree that the game has been postponed and that, until future notice indicating otherwise, this game will not be scheduled to be played. 4. In the comments box (if enabled), you may provide comments regarding your responses. 5. Once you have responded to the games, click the "Submit Responses" button at the bottom. You'll receive an email confirmation of your responses a short time after clicking “Submit.” If enabled, your assignor will receive a copy of the response by email. | ||
Using the Paysheet System | ||
| Article ID:216 | Posted:10/13/2016 3:38:11 AM | Updated:4/26/2018 9:37:21 AM |
Once enabled, you�ll see some new icons on the game schedule.
The paysheet page will show the game details followed by the officials assigned along with their details as set on the paysheet configuration page. On the paysheet page will be several buttons at the top of the page that will lead to various export options and to a �printable� version of the page�a much cleaner view without the menus, buttons, and most of the links that appear on the regular view of the page. If the paysheet includes more than one game, there will be a summary section at the bottom of the listings that summarizes the total amounts to be paid to each official from each payor represented on the paysheet page. When a paysheet page with multiple games is printed, each game will appear on a new page and the summary section for each payor will be on a new page. | ||
More Info for ADs/Coaches | ||
| Article ID:236 | Posted:4/26/2018 9:34:34 AM | Updated:4/26/2018 12:30:44 PM |
The game listing shown on the home page is just a summary of the upcoming games. What is included in that summary depends on various settings chosen by your organization. If that list of games doesn't include what you wish to see, there are several ways to see additional games. At the bottom of the summary will be several links that will take you to a variety of lists of games based on your teams/schools role in the game. Additionally, you can use the main menus to navigate to the games page (under Schedules). From there, you can use a "Game Search" form to search for games using a large number of criteria. Additionally, on the games page, you will find a "Quick Links" menu near the upper left. In it you will find a large number of pre-configured searches. | ||
How to add games... | ||
| Article ID:39 | Posted:4/25/2007 8:15:34 PM | Updated:5/20/2018 7:28:24 PM |
To add games to the system:
After saving the game, the add-game/match form will remain open for adding another game. It will be pre-filled with the data from the just saved game/match. You can then modify those items which are not the same as the prior entry and save again without needing to re-enter much of the same info. If you do not need to enter another game, you can simply close the form....click "Close and Reload" to have the main listing show the saved information. Even if you do not click "Save and Reload" the information was already saved at the time of the Update. Tips for game entry...
| ||
How do I transfer an official or school/team to my personal address book? | ||
| Article ID:84 | Posted:6/5/2007 10:21:28 AM | Updated:4/16/2013 9:36:37 PM |
|
RefTown provides users the ability to transfer individual contacts to their personal address books such as Palm, Outlook, etc. To do so:
| ||
What effect do the "Unlisted" options on the registration forms and roster have? | ||
| Article ID:85 | Posted:6/5/2007 10:25:44 AM | Updated:11/3/2010 12:34:06 AM |
When a particular piece of contact information is marked as unlisted, it is only accessible to specific individuals in an association: administrators, assignors, and treasurers. In some cases, otherwise unlisted email addresses may be made accessible to other officials who are assigned to the same games. Bear in mind that if you mark all items as unlisted, your fellow officials will not be able to contact you. Note: RefTown will never make ANY roster information available to the public. Only logged-in officials have access to roster information. | ||
When does filling out the registration automatically update my account information? | ||
| Article ID:86 | Posted:6/5/2007 10:28:58 AM | Updated:6/21/2010 11:42:27 PM |
If an official, school/team, or school/team contact is logged in when filling out the registration form, all contact information will be updated to match what is submitted on the registration form. Also, if a user is logged in when filling out the registration form, the form will start will all the currently entered roster information—saving a bit of typing and reducing the possibility of errors. | ||
What profile and preference information can a user update? | ||
| Article ID:137 | Posted:6/19/2008 12:15:24 AM | Updated:9/19/2019 1:16:18 PM |
Each user can maintain most of his/her own profile information. To do so (after login):
| ||
How do I print or export an officials or schools roster? | ||
| Article ID:56 | Posted:4/25/2007 11:52:22 PM | Updated:6/21/2010 11:22:29 PM |
The printing of rosters from RefTown is done by exporting the data to your own application (e.g. Excel) for formatting as you wish. To export a roster:
In order to protect the email addresses of those on the roster from potential junk mail, the exported information will not include email addresses unless you are an administrator. | ||
What does "Disable Email" do for email addresses? | ||
| Article ID:221 | Posted:10/16/2016 12:32:17 AM | Updated:11/9/2021 2:59:04 PM |
If "Disable Email" is checked for an email address for an official or school/team contact , it will appear on the roster (for those with permission to see it) but the system will not use that email address when sending notices. | ||
Various Roster Functions | ||
| Article ID:223 | Posted:10/16/2016 12:51:36 AM | Updated:10/16/2016 12:51:36 AM |
When looking at a roster of schools/teams, school/team contacts, or officials, you may find numerous symbols. Those symbols include
| ||
Syncing License/Certification Information with External Systems | ||||||||||||
| Article ID:321 | Posted:9/2/2024 9:57:18 PM | Updated:9/8/2024 4:36:47 PM | ||||||||||
Reftown has the ability to synchronize certification/license data with external systems. Reftown Syncs with:
The synchronization of license info for both systems depends on matching up the officials between the two systems. Each organization can be programmed to match on a variety of criteria, up to 4 different elements. Matches can be made using the following:
Some organizations require a match on all 4 lines. Some allow for a "3-point" match. A "3-point" match includes Email, Last Name, and either a First Name/Nickname match OR a Date of Birth match. Some organizations may even choose to allow a less precise match using as little as the email address. Note that capitalization does not matter. The actual letters, numbers, punctuation, and spacing does matter. If your account is not matching the USSF/Arbiter system, you will need to update your profile on one of the systems to match the information in the other. It doesn't matter which one you update. Note that updates in the external systems may not immediately be available to Reftown. Please allow for a few hours for the changes to appear. An official see the status of his or her licenses and registration under their profile by clicking their name in the top right, then "My Profile". The information is in the section for "My Qualifications". USSF Name or Date of Birth Updates: https://ussoccerfederation.my.site.com/lcsupport/s/article/Change-Profile-Page-Name-and-Date-of-Birth | ||||||||||||
Setting up Reftown and Google Maps for Embedded Maps | ||
| Article ID:329 | Posted:7/24/2025 8:32:16 PM | Updated:2/25/2026 4:59:40 PM |
This is used to set up Reftown for calculating precise driving distances related to assignments. Logging Into a Google Cloud Account
Creating a Google Cloud API Key for Embedded Maps After logging into the Google account as described above, execute the following steps to enable the API create your Google Maps key.
Applying the Key for Use on Reftown. After creating the API key on the Google Cloud Console, you will then need to copy the key and paste it into the Reftown configuration pages.
| ||
How can I transfer Games, Meetings, or Events to my personal calendaring program such as Outlook, Google Calendar, or other calendaring application? | ||
| Article ID:77 | Posted:5/8/2007 2:53:06 PM | Updated:8/5/2022 11:29:12 AM |
Below are the instructions for transferring games, meetings, or events from RefTown to your personal calendaring program. Even though all applications are not mentioned, the steps for at least one of the three below should work for nearly any calendar application...only the steps taken within the calendar application should vary. Note the following:
Depending on how Outlook is configured, it may add the games as a 2nd calendar. If you're rather have the items imported to the main calendar, follow these steps...
GOOGLE Calendar: (single or multiple games):
Other Calendar Applications: See their documentation for how to import .ics or .vcs files. It is likely:
| ||
How is driving distance calculated? | ||
| Article ID:133 | Posted:5/20/2008 9:16:16 AM | Updated:11/2/2018 12:12:25 AM |
Driving distance is an approximation based on the address or zip code of the game site and the address or zip code of the official. RefTown converts each person/location's address to latitude and longitude if that can be determined and, if not, uses a database of the latitude and longitude of the center of each zip code to calculate approximate driving distance. The calculation assumes a straight route plus an extra 20% to account for the fact that the roads will not actually be a straight line. The game site address and zip code is taken directly from the Schools/Teams roster for the site listed as the location of the game. If no address or zip code is entered for the location, the driving distance will be assumed to be 0�everyone will be eligible to drive to that location no matter the actual distance. By default, the official's zip code is taken from the official's roster entry. Optionally, each official can specify two alternative zip codes under their "Account" profile. An official can specify two zip codes and a time if they generally transition between the two. Additionally, an official can specify zip codes on their availability calendar to apply to the day/date and window of time being entered on that calendar. This can be used to influence the assignment of games to be near two different places depending on the time of day and on various days. If no zip code is listed for an official, the driving distance will be assumed to be the official will be considered eligible to drive to any location. An official can update their effective zip codes by:
| ||
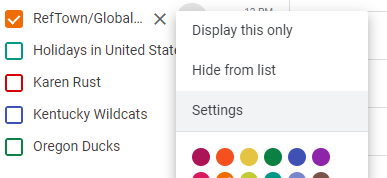
How do I unscubscribe from a RefTown Calendar Feed? | ||
| Article ID:202 | Posted:12/12/2013 12:39:04 AM | Updated:11/17/2021 9:48:06 AM |
Go to the Calendar and find the list of calendars on the left hand side To unsubscribe from your Mac:
To unsubscribe from your iPhone:
| ||
What do the colors mean on the games page? | ||||||||||||||||||
| Article ID:12 | Posted:4/20/2007 12:51:25 AM | Updated:6/21/2010 10:37:02 PM | ||||||||||||||||
| ||||||||||||||||||
What do the symbols mean on a game listing? | ||||||||||||||||||||||||||
| Article ID:13 | Posted:4/20/2007 1:00:17 AM | Updated:4/16/2013 9:36:37 PM | ||||||||||||||||||||||||
| ||||||||||||||||||||||||||
How do I print my games? | ||
| Article ID:57 | Posted:4/25/2007 11:55:16 PM | Updated:6/21/2010 11:23:17 PM |
To print your games in a more printable form:
Note: If you're using a recent generation browser, you can even scale the page to fit more on a page by clicking the % at the bottom right. | ||
Can officials see who is assigned to games? | ||
| Article ID:22 | Posted:4/25/2007 8:54:11 AM | Updated:10/16/2016 12:33:33 AM |
Yes, depending on the options chosen. By default, officials can only see who is assigned to games/matches that are on the same date and at the same sight as their own assignments. They can access this information by clicking Each organization also has three additional options:
Administrators can find these options under Association Configuration -> "Games/Matches" then "Display Options." | ||
Can schools see who is assigned to games? | ||
| Article ID:23 | Posted:4/25/2007 8:55:30 AM | Updated:4/26/2018 9:41:29 AM |
Yes, depending on the options chosen by the organization. By default, schools cannot see who is assigned to games/matches. Organizations have the following options, however:
Administrators can find these options under Association Configuration, "Games/Matches," then "School Options." | ||
How do I view my future assignments? | ||
| Article ID:7 | Posted:4/20/2007 12:29:04 AM | Updated:6/21/2010 10:28:03 PM |
By default, you can get to your own games/matches by clicking on the "Schedules" menu and then selecting "Games" (All references to "Games" may say "Matches" or "Meets" depending on your sport). If you have set your default view to show "Today's Games," click on the "Schedules" menu and then select "Games." Once there, you can get to your future games by clicking on "My Future Games" within the QuickLinks menu. Alternatively, from any game view, open the search form by clicking on "Search for Games," then select "From Today" and clear all other fields or checkboxes, then click "Search." | ||
How do I find my past assignments? | ||
| Article ID:8 | Posted:4/20/2007 12:32:17 AM | Updated:3/23/2018 2:08:28 PM |
There are a few ways�here are two:
Or...
NOTE: If you are looking for games from a prior season, your organization may have moved them to an archive. You may need to enter the archives as described in order to access past seasons. | ||
How do I see all of my assignments? | ||
| Article ID:9 | Posted:4/20/2007 12:33:04 AM | Updated:10/16/2016 2:27:56 AM |
There are a few was...here are two:
Or...
| ||
How do I find other games at the same sites as a listed game? | ||
| Article ID:10 | Posted:4/20/2007 12:35:17 AM | Updated:4/16/2013 9:36:37 PM |
Adjacent to the date and time for the game of interest, click on the icon with the two black arrows—one pointing right, one pointing left: An officials assigned to the location and date access will also see the officials assigned to all games at the same site on the same date, regardless of the assignment visibility settings. | ||
How do a find specific games? | ||
| Article ID:24 | Posted:4/25/2007 9:06:41 AM | Updated:4/26/2018 9:40:35 AM |
There are several ways to locate games/matches. The primary way to access games is through the Schedules - > Games/Matches page search form ("Search for Games/Matches"). Select the criteria of interest: date(s), schools, levels, leagues, etc. and then click "Search Now." Make sure to clear any field you do not wish to search on (e.g., your own name is selected by default under the officials field). Note that once you've searched for a set of criteria, the header of the games page will not only list the criteria searched with, but also will, for most fields, have a "Previous" and "Next" link. You can step a day at a time or a school at a time with these links. There are also other ways to locate certain categories of games/matches. Using the QuickLinks at the top of the Games/Matches page, you can access the most commonly used set of searches: today's game, tomorrow's games, etc. In addition, Assignors and Administrators can access schedules from the rosters. For each school/team on the roster, there may be several links available to take you to games/matches at that location, have that team as the home team, have that team as the away team, or all of the above. | ||
Can I see who is assigned to other games? | ||
| Article ID:25 | Posted:4/25/2007 9:11:27 AM | Updated:4/26/2018 9:40:15 AM |
It depends on the settings chosen by your organization. By default, officials can only see who is working at games at the same location and on the same date as their own assignments. Other games will only show "Assigned" or "Unassigned" in place of the officials' names. Some organizations even choose to hide from officials the assignment status of games not assigned to the official. Some associations choose to reveal all assignments to all officials, but some enable the ability to see the assigned officials' names when searching for games by a specific date or within a certain number of days preceding a game. By default, schools/teams can not see the officials. There are options for an organization to reveal the officials names to the payor or to any team on a game. When the names are generally visible, the names can be hidden until the official accepts the assignment. | ||
How do I find games that are available for self-assignment (or request) and claim (request) the assignment? | ||
| Article ID:33 | Posted:4/25/2007 7:19:13 PM | Updated:9/9/2024 9:33:06 PM |
The two most common ways: Home Page Link: From the homepage, there will be a notices box indicating the presence of games that have been posted for self-assignment but have not yet been claimed. You can click on the link on the home page to go directly to the list of available games. Games Page Search: Go to the Games page under the Schedules menu and click on "QuickLinks" -> "with Open Self-Assignments." When you see a game you'd like to take, click the "Claim" or "Request" link by the position you wish to fill. The system will first verify that you do not already have a game on the same date. While it will NOT prevent you from taking multiple games on a single date, it will caution you about the possibility of conflicting assignments and will ask for confirmation. When you confirm the "Claim", your name is put on the game, you are marked as accepting the game, and the game is no longer listed on the open games list as available (if all slots have been claimed). When you confirm a "Request", you name is added to a list for an assignor to review when making assignments to a that game. The specific position you've requested is indicated, but the assignor will still see your name for other positions on the same game that you would be qualified for. If you then change your mind about the assignment, you must contact your assignor to have your name removed from the assignment OR, if the organization has it enabled, you can "Turnback" the game. Note, you can only self-assign into games your organization has deemed you to be qualified for. This might include things like:
The specific requirements depend on your organization's configuration. If you are missing some fundamental requirement, you may see the list of games but will see a noticed indicating what you're missing. If your organizations do not have you as qualified for a game, you will not see those games. If you do not see games you believe should be available to you, you will either need to complete the elements you're missing that can be done by you OR you will need to contact your assignor to have them enable your account. | ||
How do I print my games? | ||
| Article ID:57 | Posted:4/25/2007 11:55:16 PM | Updated:6/21/2010 11:23:17 PM |
To print your games in a more printable form:
Note: If you're using a recent generation browser, you can even scale the page to fit more on a page by clicking the % at the bottom right. | ||
How do the Previous and Next links work on the games pages? | ||
| Article ID:79 | Posted:5/8/2007 3:04:26 PM | Updated:11/3/2010 12:40:43 AM |
There will be "Previous" and "Next" links on each games page in the area that lists the current filter criteria. The links present themselves when the current view is based on a specific date, location, home team, visiting team, etc. These links will analyze the games data to take you to the next item in the list (by date or alphabetically) that actually has a game. For example, clicking “next” after searching for games on 12/5/2008 will take you to the next date with games. If there are no games on 12/6/2008, it will move on to the next date that has games. Note, however, that the previous/next links do not consider other filter criteria. For example, if the next date that has some type of game is tomorrow but none of tomorrows games fit your current search criteria, the next button will still take you to tomorrows games....but will list nothing since there are no games on that date that match the other criteria. | ||
How do I search for games by game number? | ||
| Article ID:91 | Posted:6/5/2007 4:15:26 PM | Updated:6/21/2010 11:44:56 PM |
| ||
What games show by default on the games page? | ||
| Article ID:94 | Posted:6/5/2007 4:58:55 PM | Updated:11/2/2018 12:11:59 AM |
Normally, your own games from today and forward will show when you first access the games page. However, under your Account Menu (red box with your name at the top):
| ||
How can I subscribe to a calendar feed (iCal/ics) of my assignments and/or meetings and events? | ||
| Article ID:186 | Posted:6/29/2011 2:58:34 PM | Updated:12/29/2022 11:27:41 AM |
To subscribe to a RefTown calendar feed in the iCal/ics format in another application you wil need to obtain a special RefTown address that is unique to you. There are four ways to get to the addreses for the subscriptions (all take you to the same place)....
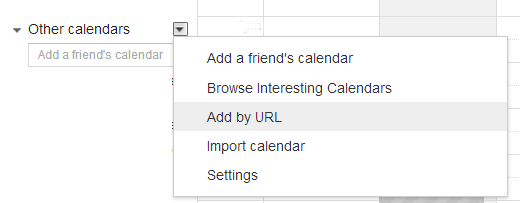
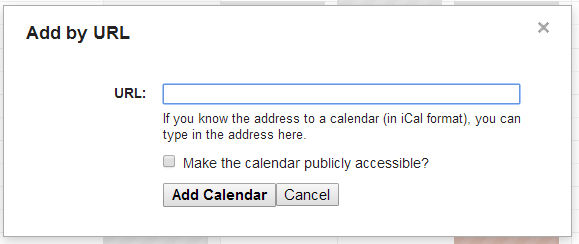
Once there, you will then need to decide if you wish to access a single "global" feed for all organizations on one calendar or a separate single-organization feed...if you only belong to a single organization, the two choices are equivalent. If you have not previously generated a key, click the "Generate New Key". This will create three options that will grant read-only access to information from your account: your game schedule, your meeting/event schedule, or a combination of the two. You can use any of these addresses in other calendar programs to show your schedule without needing to manually import your schedule in those programs. Updates to your schedule will automatically be synchronized (a few times a day in most cases). You can also share one or more addresses with mentors, spouses, etc. so they can stay up-to-date on your schedule in their own calendar application without requiring you to communicate the details of your schedule to them. At any time, you can return the subscription page to invalidate and replace the keys you've generated. Doing so will block all further accesses to your schedule that use the old key. Subscribing to the CalendarNote: Changes to your RefTown schedule may take up to 24 hours to refresh in some calendar applications...particularly any web-based calendar application where the update rates are controlled by the calendar application provider.
Outlook and iCal and other desktop-based calendar applications can update more frequently as controlled by a combination of desktop application's settings and information from RefTown. RefTown provides the calendar application suggested update rates that will depend on the contents of your calendar. If your calendar has no future events, RefTown will suggest daily updates. If your calendar has upcoming items, the suggested update rate will be more frequent....every few hours. iPhone
See http://www.iphonefaq.org/archives/97782 and http://www.iphonefaq.org/archives/97922 for more info. Outlook
Google Calendar
Windows Live
Mac iCal
AndroidAndroid does not directly support calendar subscriptions. Follow the instructions above for Google Calendar.
Then, under your phone's calendar options, select/enable this calendar to be shown. On the phone, go to
| ||
Using the Game Search Form | ||
| Article ID:222 | Posted:10/16/2016 12:42:20 AM | Updated:4/26/2018 9:37:06 AM |
On various game-related pages, you will find a fairly powerful search form. You can search/filter the various pages/reports based on nearly all game criteria: Date, Status, ID #, nature of the game, the participants of the game (by name or by categorizations), by administrative ownership, or by the text in the various comment fields. When execution those searches, it is possible to select multiple items in each drop down list. However, to do so, you must first click the "Multi-Search" button at the top in order to enable that functionality. This is not on by default because it can put a large burden on some user's internet browsers, making the loading of the related pages very slow, even if they were not intending to use the search. If it works well on all of the systems you normally use, you can enabled it permanently under your profile options. Also, when using the game search, you'll have the option of formatting the output (on some pages) in one of several formats. Those formats include:
In most of the Grid-based formats, you have choose whether to include various game details. | ||
Can on official see assignments before they are published? | ||
| Article ID:225 | Posted:10/16/2016 2:31:04 AM | Updated:10/16/2016 2:31:04 AM |
By default, game assignments are not visible in any form until they are published. However, an optional feature can allow officials to see that they have "something" on a given date without any details aside form the date and the general time of day. To enable this feature...
| ||
I'm getting a lot of change reminders about game changes but not from RefTown | ||
| Article ID:272 | Posted:5/19/2021 2:37:41 AM | Updated:8/1/2025 9:07:18 PM |
If you are receiving a lot of emails indicating that there has been a change to your game but there doesn't seem to be a change, first note where the email is actually coming from. RefTown's notices always come from mailer@reftown.com. If the emails are coming from somewhere else, it isn't RefTown that is sending them. Often, Google calendar mistakenly sends an update as if games have changed when they haven't. Their emails come from calendar-notification@google.com. You can disable these notifications. To do so:
| ||


How do I accept my assignments (officials)? | ||
| Article ID:11 | Posted:4/20/2007 12:44:00 AM | Updated:10/16/2016 12:30:33 AM |
Click on "Unaccepted Games" on the home page listing of your upcoming games. Alternately, you can go to "Schedules" -> "Games." If you're using the default settings, you'll get a list of your own games. If not, click on either Quick Links -> "My Games" -> "Unaccepted" (or Future). Then do the following: 1. By any game that says "Accept?," click the "Yes" button to take the assignment or click the "No" button to decline it. If you click "No", a "Reason" box will appear. Some organization will require that you enter something for the reason. 2. By any game that says "Cancel OK?," click the "OK" button to indicate you are aware that you are no longer assigned to that game or that the game has been canceled. 3. By any game that says "Postpone OK?," click the "OK" button to indicate that you are aware the game has been postponed and that, until future notice indicating otherwise, you will not be expected to fill the assignment. 4. In the comments box (if enabled) you may provide comments regarding your responses. Some organization will require a response when an assignment is declined. 5. Once you have responded to the games, click the "Submit Responses" button at the bottom. You'll receive an email confirmation of your responses a short time after clicking "Submit". � If the feature is enabled, your assignor will receive a copy of the response by email. | ||
How do I approve my school/team schedule? | ||
| Article ID:20 | Posted:4/24/2007 11:53:54 PM | Updated:4/26/2018 9:41:52 AM |
Go to "Schedules" -> "Games" then take the following steps: 1. By any game that says "Approve?," click the "Yes" button to confirm that the entry is correct or click "No" button if it is incorrect. 2. By any game that says "Cancel OK?," click the "OK" button to indicate you are aware that officials will no longer be sent to that event. 3. By any game that says "Postpone OK?," click the "OK" button to indicate you agree that the game has been postponed and that, until future notice indicating otherwise, this game will not be scheduled to be played. 4. In the comments box (if enabled), you may provide comments regarding your responses. 5. Once you have responded to the games, click the "Submit Responses" button at the bottom. You'll receive an email confirmation of your responses a short time after clicking “Submit.” If enabled, your assignor will receive a copy of the response by email. | ||
Can an official change their response to an assignment after it is submitted? | ||
| Article ID:89 | Posted:6/5/2007 4:03:33 PM | Updated:6/21/2010 11:36:37 PM |
If an official wants to change a response from decline to accept, that official should contact the appropriate assignor. The assignors have the ability to change the response. If an official wants to change a response from accept to decline, the official will have one of two options, depending on the settings that official’s organization has chosen. If the organization has enabled the turnback option and the deadline for a turnback has not passed (another option that is usually set to 2 or 3 days before the game), the official should see a "Turnback" link directly under the game number on that official’s schedule. If no turnback link appears, the feature is not enabled and the official is not permitted to change previous responses through RefTown once they are submitted. When the turnback feature is either not enabled or the turnback deadline has passed, the official should contact the assignor so the assignor can change the response. | ||
Who receives an email confirmation of accepted/declined assignments? | ||
| Article ID:93 | Posted:6/5/2007 4:39:18 PM | Updated:11/3/2010 12:45:30 AM |
When a set of games is assigned, an email confirmation is generated. That email is sent to the following:
For the purposes of these responses, the assignors who will receive the email are defined in 3 ways as defined under the association's configuration:
NOTE: An association can, to reduce unnecessary email, choose to disable emails in two cases:
| ||
What happens if an assignment remains "unaccepted"? | ||
| Article ID:226 | Posted:10/16/2016 2:39:35 AM | Updated:10/16/2016 2:39:35 AM |
If an assignment remains in unaccepted state, normally nothing happens. It is merely a communication indication. It has no effect on any other site function. The exception to that is the "Assignment Expiration Deadline". If that function is being used by an organization, it is possible that the assignment will be canceled by either the administrator or, if enabled, automatically by the system when the deadline is passed. A game/assignment in unaccepted state will still be invoiced the same as any other game. | ||
How does the availability feature work? | ||
| Article ID:51 | Posted:4/25/2007 11:11:46 PM | Updated:10/29/2013 10:30:02 PM |
The availability feature allows officials or administrators to enter information about when an official is available to take an assignment.
Availability is determined in the following order:
Most organizations also make use of RefTown's cross-organization assignment-to-availability blocking....if you have an assignment for organization A, the site can automatically block you for organization B. Each official can specify a priority order between organizations such that a more preferred organizations will always block less preferred organizations but the less prefereed organization will not block the more preferred organization. The priority preferences can also be configured to allow the first organization to enter and publish an assignment to claim the date. Each official will also have the control over how much information regarding their assignments is shared with other organizations. The date/time at the bottom of each box is the last time that entry was updated. | ||
How do I enter information in my availability calendar? | ||||||||||||||||
| Article ID:53 | Posted:4/25/2007 11:34:11 PM | Updated:5/12/2023 9:46:41 PM | ||||||||||||||
Availability information is entered through "Schedules" -> "Availability" You have two ways that availability information can be entered.
If both are entered, the specific date information is used. If you have accounts on Reftown with more than one organization, you have two levels where you can ether availability information
If you only belong to one organization, the global options will not appear. The system will use the first information it finds by looking at each source in the following order:
The priority is determined on a date-by-date basis. If in in doubt about how the multiple calendars work, use your organization's date specific calendar. To enter availability information for specific dates for the current organization:
To enter availability information for specific dates for all organizations:
To enter availability information by day of the week for the current organization:
TIPS ON ENTERING AVAILABILITY INFORMATION To block an entire day/date
There are also additional slots for up to 2 time windows of availability. To access the additional slots, click the + button after the last visible time slot. If any of the time windows indicates you are available for a given time, you will be considered available for that time. Examples:
If you organization use the driving distance feature, each time slot will have a zip code box that you can use to specify where you will be starting from at that time. If you do not enter a zip code in these boxes, your general early/late zip codes will be used or, if those are not entered, your home zip code will be used. For example, you could put a zipcode for the east side of your city for a time slot from 3pm to 6pm and then a zip code on the west size of town from 6pm to 9pm to indicate you start in the east side of your town but move to the west side later in the evening. You can have up to 2 different locations each day. There are a 4 buttons at the top of the calendar that may assist you in filling out your availability. You can use them to make all days/dates as available, not available, or clear all information, or replicate the first 7 days of the month to the rest of the month. Use this if most of your availability is the same and then fill in the boxes that are different. Each date/date box has a button to delete that box's information....it is a small red X at the top of each date's box on the calendar. Updates to your availability calendar take effect immediately. However, it is possible that assignments that are made but not yet published might be in conflict with availability data entered after the assignment was initially entered. The assignor also has the option to override the availability and assign you in conflict with your availability. It is also possible, in the event of a rescheduled game, for you to be assigned to a game in conflict with your availability. The assignor may, at the time it is rescheduled, choose to leave you on that game or may choose to reassign it to someone else. | ||||||||||||||||
How do I use the boxes on the availability calendar? | ||
| Article ID:54 | Posted:4/25/2007 11:34:54 PM | Updated:8/24/2016 1:12:12 AM |
RefTown availability works solely based on the start time of an assignment.
| ||
Can officals "scratch" certain schools, levels, leagues, etc.? | ||
| Article ID:70 | Posted:4/27/2007 1:01:03 AM | Updated:10/5/2016 12:41:10 PM |
Yes. An official can enter a restriction into the system that they should not work for particular school, team, level, league, etc. or any combination of these items. Official can scratch locations or even locations by zipcode. To do so:
Assignors can also fill out scratches on behalf of officials. Assignors can choose whether or not to allow officials to see those scratches. Some organizations may not allow officials to manage this data....only permitting assignors to enter scratch data. | ||
Availability - How do I tell the assigner of my work availability? | ||
| Article ID:150 | Posted:2/27/2009 8:08:06 AM | Updated:11/3/2010 1:10:01 AM |
To notify the assigner of your availability, go to Schedule->Availability. There are two levels of identifying availability:
Specific availability takes priority over General Availability. | ||
Cross-Organization Assignment-Based Availability | ||
| Article ID:199 | Posted:10/11/2013 1:07:50 AM | Updated:3/12/2024 10:49:52 AM |
RefTown has a feature where officials can have the system automatically share basic assignment information between organizations so that they do not need to update each organization's availability calendar each time they get an assignment. The official (and only the official) can, under his/her profile settings, define a set of priorities between organizations. Administrators and assignors can not see each official's settings in this area and can not change them.
CONFIGURING YOUR AVAILABILITY PRIORITY
NOTES
| ||
Other Availability Limits - Maximum Days / Day Off / Etc. | ||
| Article ID:333 | Posted:9/11/2025 10:23:06 AM | Updated:9/11/2025 10:23:06 AM |
In addition to being able to control which days of the week or specific dates and an official is available, it is also possible to restrict an officials assignments based on the number and frequency of those assignments. Both officials and assignors can set these values for an official. The settings that are available are:
TO UPDATE THESE ITEMS Official:
Administrator:
| ||
What is the difference between a Ballot and a Signup and an Exam/Quiz? | ||
| Article ID:140 | Posted:10/14/2008 8:27:34 AM | Updated:11/16/2010 12:55:59 AM |
They are the same in nearly every way. The ballot is a "secret" ballot system. No one has access to the details of the ballot submissions. Depending on options selected, administrators of the ballot may be able to see a list of who has submitted a ballot (but, again, not thier choices). The option selected will be shown on the ballot. The signup is much like the ballot except that the administrators can see the details of the submissions....who selected what. The quiz/exam allows you toenter a "correct" answer and will generate a % correct score.
| ||
How do the instant run-off elections work? | ||
| Article ID:144 | Posted:10/14/2008 9:24:32 AM | Updated:6/22/2010 11:53:09 AM |
The instant runoff voting tabulates votes based on the principle that any vote cast for a last-place candidate shall be transferred to the next-choice candidate on that ballot until one candidate has a majority of votes. This ballot-count method duplicates what would occur if all voters participated in a graduated series of runoff elections. Vote counting shall start with a tabulation of first-choice votes. If a candidate receives a majority of the first-choice votes, then that candidate shall be declared elected. If no candidate receives such a majority, then the candidate with the fewest first choices shall be declared defeated. Ballots cast for this defeated candidate shall be transferred at full value to the next-choice candidate marked on each ballot. Last-place candidates are eliminated and their supporters' ballots transferred to next-choice candidates who are still in the race in a similar manner until a candidate receives a majority of votes that have not been exhausted. If a ballot has no more available choices ranked on it, that ballot shall be declared "exhausted." If there are two candidates with fewest number of first place votes, the number of second-place votes are included. If that still doesn't break the tie, third-place votes are included, and so on. It's still possible, but highly unlikely, that there will still be a tie. Example: 4 candidates, 50 voters A: 22 first-place votes B: 16 first-place votes C: 6 first-place votes D: 6 first-place votes No candidate has a majority of the first-place votes. This voting method drops the one with the fewest votes. In this case, there are two. Which one to declare defeated? Since they have the same number of first place votes, the second-place votes for those two are considered for the tie-breaker. C: 10 second-place votes D: 13 second-place votes C is eliminated and D remains. The 6 ballots that have C as their first choice are referenced for their second choice (they be come first choice votes now that C is no longer in the race, the 3rd place votes become 2nd, etc.) Of those six votes, two have A second, and 4 have B second. That gives the following: A: 24 first place votes B: 20 first place votes D: 6 first place votes Still no majority. D is alone in last place, so D is eliminated. The 6 ballots that have D as their first choice are referenced for their second choice. Those votes are added to A and B. One of them will now have a majority or there will be a tie. If there is still a tie, the one with the greater number of first place votes in the prior round is declared the winner—having more natural first place votes. | ||
How does the ballot/voting/quiz system work? | ||
| Article ID:143 | Posted:10/14/2008 9:09:19 AM | Updated:2/28/2017 11:41:04 PM |
� The Reftown Ballot/Signup system provides a secure, independent method of collecting votes for various purposes. � The system remembers who has voted and when. It will not permit a revote by the same individual. � The details of a submitted ballot are not available to anyone else in your organization.
� Once votes are cast, removing options is not permitted or supported—that would corrupt the votes already cast. � A voter can confirm that the voter’s own ballot was received by returning to the ballot—the time and date of the submission will be displayed with a notice that the voter can not vote again. � Like game assignments, ballots/signups remain invisible to the members until published. � Ballots/signups open and close automatically based on the dates entered. Once a ballot/signup opens, changes are not permitted. | ||
How do I export or import questions to an exam, ballot, or signup? | ||
| Article ID:187 | Posted:8/16/2011 2:54:21 PM | Updated:3/28/2021 10:07:21 PM |
The import and export functions can be used in a few ways. Most commonly, they can be used to enter multiple questions using Excel rather than through the website. These features can also be used to share entered exams between different organizations....export from one, import to the other. EXPORT:
IMPORT: In order to import questions for an exam, ballot, or signup, you must first configure the basic exam, ballot, or signup.
CREATING A NEW SPREADSHEET READY FOR IMPORT:
You do not need to import everything at once. You can import a few questions at a time. Note, however, that every question in the import will be added regardless of whether it was previously imported or not. | ||
Are there printable versions of pages? | ||
| Article ID:55 | Posted:4/25/2007 11:44:59 PM | Updated:4/16/2013 9:36:37 PM |
For most pages, there will be a printer icon | ||
How can I transfer Games, Meetings, or Events to my personal calendaring program such as Outlook, Google Calendar, or other calendaring application? | ||
| Article ID:77 | Posted:5/8/2007 2:53:06 PM | Updated:8/5/2022 11:29:12 AM |
Below are the instructions for transferring games, meetings, or events from RefTown to your personal calendaring program. Even though all applications are not mentioned, the steps for at least one of the three below should work for nearly any calendar application...only the steps taken within the calendar application should vary. Note the following:
Depending on how Outlook is configured, it may add the games as a 2nd calendar. If you're rather have the items imported to the main calendar, follow these steps...
GOOGLE Calendar: (single or multiple games):
Other Calendar Applications: See their documentation for how to import .ics or .vcs files. It is likely:
| ||
What Browsers are supported? | ||||||||||||||||||||||||||||||||||||||||||||||||||
| Article ID:161 | Posted:9/17/2009 12:41:50 AM | Updated:11/3/2010 1:13:15 AM | ||||||||||||||||||||||||||||||||||||||||||||||||
| ||||||||||||||||||||||||||||||||||||||||||||||||||
How to configure your computer to use an installed application when you click on an email address or email icon. | ||
| Article ID:180 | Posted:1/6/2010 11:20:05 PM | Updated:11/3/2010 1:14:18 AM |
When you click on an email address on RefTown, you should be taken to your personal email program if it is properly configured and email links are supported by your email program. On Windows XP, Vista, and 7, you can set the default email program in the Internet Options dialog box. Open Internet Explorer and click the Tools menu, choose Internet Options. Click Programs tab and select your email client from the drop-down list. Once selected, click OK button and close the dialog. If you do not see your email program listed, you may need to contact support for that program for information on how to make it your default email client. Note that you will require an Administrator-level account to change the default email client as this is a system-wide setting. For instruction on configuring GMail to be your default client, see http://email.about.com/od/gmailtips/qt/et_default_prog.htm | ||
How can I subscribe to a calendar feed (iCal/ics) of my assignments and/or meetings and events? | ||
| Article ID:186 | Posted:6/29/2011 2:58:34 PM | Updated:12/29/2022 11:27:41 AM |
To subscribe to a RefTown calendar feed in the iCal/ics format in another application you wil need to obtain a special RefTown address that is unique to you. There are four ways to get to the addreses for the subscriptions (all take you to the same place)....
Once there, you will then need to decide if you wish to access a single "global" feed for all organizations on one calendar or a separate single-organization feed...if you only belong to a single organization, the two choices are equivalent. If you have not previously generated a key, click the "Generate New Key". This will create three options that will grant read-only access to information from your account: your game schedule, your meeting/event schedule, or a combination of the two. You can use any of these addresses in other calendar programs to show your schedule without needing to manually import your schedule in those programs. Updates to your schedule will automatically be synchronized (a few times a day in most cases). You can also share one or more addresses with mentors, spouses, etc. so they can stay up-to-date on your schedule in their own calendar application without requiring you to communicate the details of your schedule to them. At any time, you can return the subscription page to invalidate and replace the keys you've generated. Doing so will block all further accesses to your schedule that use the old key. Subscribing to the CalendarNote: Changes to your RefTown schedule may take up to 24 hours to refresh in some calendar applications...particularly any web-based calendar application where the update rates are controlled by the calendar application provider.
Outlook and iCal and other desktop-based calendar applications can update more frequently as controlled by a combination of desktop application's settings and information from RefTown. RefTown provides the calendar application suggested update rates that will depend on the contents of your calendar. If your calendar has no future events, RefTown will suggest daily updates. If your calendar has upcoming items, the suggested update rate will be more frequent....every few hours. iPhone
See http://www.iphonefaq.org/archives/97782 and http://www.iphonefaq.org/archives/97922 for more info. Outlook
Google Calendar
Windows Live
Mac iCal
AndroidAndroid does not directly support calendar subscriptions. Follow the instructions above for Google Calendar.
Then, under your phone's calendar options, select/enable this calendar to be shown. On the phone, go to
| ||
Accessing Archived Information | ||
| Article ID:235 | Posted:3/23/2018 2:01:23 PM | Updated:3/23/2018 2:12:31 PM |
Archives contain a frozen snapshot of an organization's data. Archives allow a user to view the organization's information as it was on date the archive was made. To access an archive:
When you are in the "archive" mode, a few things happen:
To exit archive mode and return to viewing your current data:
OR
OR
| ||
Transfer School/Team Contact Account to New Person (for AD's, Athletic Assistance, Secretaries, Coaches, etc.) | ||
| Article ID:293 | Posted:5/16/2022 12:29:28 PM | Updated:5/16/2022 12:33:29 PM |
As a school/team contact (Athletic Director, Athletic Assistant, Athletic Secretary, Coach, etc.), you may need to transfer your account to a new person. If you are the owner of the account for your school/team, you can update your profile information to transfer the account to the new person. Depending on the nature of the transition, this can be done in one of a few ways. Will the two individuals overlap in their time of service or will there be complete transition all at once? Is the current account holder still available? This procedure can update the information for ALL connected accounts (those with the same email address as used to log in to this session) in one pass.
NOTE: In the section for �Apply Changes to�� for each type of information, uncheck the any box for accounts you do not wish to change....typically, all boxes are left checked. Allow Access to Both for a Period of Time
Current Contact No Longer Present: Contact the assignor/administrator for each of your organizations and request that they move the current account to your name. If they merely change the email address, you can then log in with that information and follow the steps above to change the rest of the information. | ||
Using your phone/tablet for on-site meeting check-in | ||
| Article ID:301 | Posted:11/5/2022 6:39:29 PM | Updated:8/1/2025 9:07:56 PM |
Reftown has a function available to organizations that allow people to check themselves into an event based on their presence near a defined location. To use the check-in, log into your organization's account on Reftown. The check-in button will appear in the upper left corner of your organization's home page when a check-in is available. For it to be successful, the person checking in must be within a specified distance of a specific location set by your organization's administrators during a specified time window. Enabling iOS Location Services1. Go to Settings > Privacy > Location Services.
2. Make sure that Location Services is on. 3. Scroll down to find the Safari app (or whichever browser you're using on your device) 4. Tap the app and select an option:
Alternate instructions for iPhones Android 12 & higher
Android 11 & lower
| ||
How do I add or remove bank account information for Direct Deposit? | ||
| Article ID:191 | Posted:9/13/2011 1:55:58 AM | Updated:11/21/2024 8:07:06 PM |
For security, your entered account information is NOT redisplayed to you. You will be asked to enter each number twice in order to ensure it is entered accurately. You entire account number will not even be displayed to your administrators unless the deposit fails....a few digits are shown. These measures are taken to increase the security of this information. If you enter an incorrect info, your payments may be made to an account owned by someone else. It may not be possible to correct.
| ||
Retrieving and Confirming my 1099 | ||
| Article ID:206 | Posted:1/8/2014 10:47:05 PM | Updated:1/8/2014 10:47:05 PM |
If your organization has chosen to use RefTowns 1099 services, you should receive an email announcing its availabiity sometime in the month of January. To retrieve your 1099 from RefTown, follow the following steps:
| ||
Configure an Official's Account to Receive PayPal/Venmo Payments | ||
| Article ID:259 | Posted:1/4/2021 6:37:11 PM | Updated:3/26/2021 4:39:03 PM |
| ||
Paying for Invoices Due using PayPal without a PayPal account | ||
| Article ID:265 | Posted:3/15/2021 8:27:50 PM | Updated:8/1/2025 9:07:18 PM |
Organizations may create invoices for registration dues or other fees charged to officials. If your organization has configured an invoice to be payable by PayPal the instructions below cover how to pay the invoice without needing a PayPal account.
If you do not see this section, your organization is not configured to receive guest payments.
| ||


Getting Paid by PayPal / Venmo as an Official | ||
| Article ID:277 | Posted:8/26/2021 3:00:41 PM | Updated:10/13/2021 11:57:45 PM |
Assignors can see this signup status for all officials on the relevant games. When a payment is made, RefTown will send you an email with the details of the payment...the game(s), the amounts, etc. Once you receive the money in your PayPal or Venmo account, you can spend in from that account using a variety of options including debit cards issued by PayPal or Venmo or you can have the money moved to your bank account whenever you like. To sign up for PayPal or Venmo, you must first have your PayPal or Venmo ID (email address or phone number) listed as on your RefTown profile's email address or cell phone number fields. Once you have the email address or phone number entered in your profile as an email address or phone number, you will then be able to choose that number/email as the PayPal/Venmo account ID. To make any of these changes to your profile, click your name in the top right corner and then click "Profile". On the Profile page, you'll find all of the necessary links to update your phone numbers, emails, or PayPal/Venmo preferences. | ||
Trouble Opening a 1099 from RefTown? | ||
| Article ID:311 | Posted:1/31/2024 8:31:27 PM | Updated:1/31/2024 8:34:07 PM |
The 1099 that you receive from Reftown is password protected. The password is your SSN (or other TaxID in some cases), without any dashes. Example: If your SSN is 123-45-6789, your password will be 123456789. If you are haivng trouble opening your 1099 received from Reftown, you may have an incorrect Social Security Number in your profile. It is most often due to a simple typo in teh SSN entry in your profile.
IMPORTANT: The 1099s are NOT regenerated automatically. We generate them offline and will send you the updated copy when it is ready...usually within 1-2 days. DO NOT SEND US YOUR SSN BY EMAIL OR IN OUR SUPPORT FORM. | ||
Clearing App Data | ||
| Article ID:303 | Posted:12/27/2022 12:15:58 PM | Updated:12/27/2022 12:18:34 PM |
In a few rare cases, the data stored on your phone may be come corrupted. It may be necessary to clear the data and force the app to re-obtain current information from the server. The method to clear the app data varies based on the brand of phone but the steps are similar. See the options below for several common phone models. After clearing all the app data for Reftown Mobile, you'll need to log into the app again. How to clear app cache and data on Google Pixel
How to clear app cache and data on Samsung Galaxy phones
How to clear app cache and data on OnePlus phones
How to clear cache and data on Xiaomi phones
| ||
RefTown Updates: June 2026 | ||
| Article ID:336 | Posted:5/27/2026 8:25:42 PM | Updated:5/28/2026 10:53:14 AM |
On June 1st, 2026, a major update to Reftown will be released. There are numerous changes. In general, the things you are familiar with will still be exactly where they were before. There are a few functional changes. WHAT HAS CHANGED?
DETAILS OF THE CHANGES Graphic Theme Overhauled Throughout the site, the color scheme has shifted from a red/blue/gray to be red/black/dark grey with the colors giving better visual separation to items on a page without being a bright. This will be instantly noticeable. Content Formatting to Smaller Screens/Windows Most of the major tables through out Reftown now auto-adapt to the width of your screen/window in a way that largely eliminates the need to scroll left/right to see everything. When a row of information is too wide to fit, the columns on the right are now moved into a secondary row just below the main row, but will be hidden. When this has been done, you will see a Similarly, the major search forms have been redesigned to auto-fit to the width of your screen. If you have a wider screen/window, they'll appear almost the same. If you have a medium or smaller screen/window, they may break into 2 or more lines where the items previously were on the same line. If you're on a mobile devices, they will reformat into a vertical list of options, grouped into categories that will initially appear closed if nothing in that section is initially selected. You'll also see changes to the many other pages to auto adapt to smaller and narrow windows. Such pages include your profile page, Table Formatting Many tables where an item's contents occupied multiple lines within a table now have a separation between items to make them more visually distinct. This primarily applies to games and the various directories, The officials and payor/location/team directories have the same data rearranged just a bit. Previously, there were several small items grouped together in single columns of the main table. Now, some of those pieces of information have been given their own columns. The search forms and "Quick Links" formats have been better unified. Before, they were done 3-4 different ways with slightly but noticeably different formats. Now, they all use the same structure and look and feel the same....the "Search Form Open" button itself is now a smaller light blue button at the top right of a table instead of the blue bar that stretched across the screen. It's color now matches the "Search" button with the form itself. All the major search forms now have two "Search" buttons at the top, in the same locations and another at the bottom. Also, a button that has been present on the games pages is now on several others.... Admin Editor Screen Layout Improvements On all the main editing screens, the formats have been subtly changed so that they better fit on a narrower window. In addition. the "Update" button along with the "Close" buttons will be fixed to the bottom edge of the window. Now, you no longer have to scroll to the bottom to find the buttons. Now, when you only need to enter/update information in the top of the screen, you can more easily find the Update button. Game Management Dashboard. This dashboard was updated to hide all rows with no relevant info. For example, if there are no declined assignments, the declined assignments row will be hidden. From the search form, there is an option to have the entire report shown. Game Status Options. Until now, you had 3 options on games: Normal, Canceled, or Postponed. There was an option for "Postponed" that allowed you, for finance purposes, to treat them either as Normal (Bill Payors & Pay Officials) or Canceled (No Billing or Paying). Now, you have several options:
The new options shown in green above all essentially work the same. All of them free up the official to be assigned to another game. Games marked with such a status remain eligible for invoicing the payors and remain eligible to pay the officials. The difference is just the word that appears on the game. They give you different options for labeling the game so you can more easily note what occurred without having to manually enter notes in the comments boxes. The Postponed button Officials Custom Fields Many years ago, the initial version of the custom fields were limited and there were only had 5 spots for checkboxes, 5 spots for numbers, 5 spots for dates, and 5 spots for general text. After a while, it became obvious that some organizations needed more than that and extended the number with the original feature was not feasible. At that point, we added a new custom fields function that allowed for an unlimited number of custom fields of any of those types along with the ability to group them into categories. That new function matched all of the old custom field functions except for the ability to use them as part of your registration forms. The "new" version of this function now supports being used on registration forms. Any organization that is newer to RefTown (since early 2024) has only had access to the new fields. So, there is no change. As of this update, the data in the old old custom fields will be migrated to the new version of the feature and access to add/edit/delete the old fields will be disabled. Any data will remain in those fields for a few months for reference in case something is missed. | ||
Quick entry of times on RefTown | ||||||||||||||||||
| Article ID:129 | Posted:5/1/2008 11:46:34 PM | Updated:6/22/2010 11:38:11 AM | ||||||||||||||||
Throughout Reftown, you can enter times in several different formats as follows:
| ||||||||||||||||||
Popups on RefTown | ||
| Article ID:181 | Posted:1/6/2010 11:33:56 PM | Updated:8/1/2025 9:07:56 PM |
Adminstrator functions depend heavily on "pop-ups." It is quite possible that you may have a program installed on your system that blocks annoying pop-ups/ads from many sites. You will either need to disable that program or, more likely, add RefTown to a list of sites allowed to have pop-ups. For specific instructions to disable, configure or remove some of the most common pop-up blockers and toolbars, select the appropriate section below:
Note: Toolbars may be hidden but still functioning. To view a hidden toolbar, go to the top of your Internet browser and select View > Toolbars > click to check the desired toolbar. Only the checked toolbars in the list will be visible in your browser. Internet Explorer Integrated Pop-Up BlockerBeginning with Service Pack 2 for Windows XP, pop-up blocking has been integrated into Internet Explorer and is enabled by default. To configure IE's pop-up blocking:
If pop-up blocking is turned on in Internet Explorer, it will generate an "Information Bar" the first time you go to a website that uses pop-ups or graphical code resembling pop-up code. Click where indicated inside the Information bar and select one of the following:
Mozilla FirefoxFirefox blocks pop-ups by default. To configure Firefox's pop-up blocking:
Google Toolbar
To stop the Pop-Up Blocking feature in Google Toolbar, either:
Yahoo Toolbar
To disable the Pop-Up Blocking feature in the Yahoo Toolbar:
In Windows XP or earlier:
To configure the Pop-Up Blocking feature in the Crawler Toolbar:
To Uninstall the Crawler Toolbar either use Add/Remove Programs in Windows Control Panel, or:
Crawler ToolbarLike Ask.com/FunWebProducts, the "sponsor supported" Crawler toolbar is included with thousands of FREE downloadable products (such as screensavers, wallpaper, animated cursors, desktop weather or traffic utilities, radio & MP3 players, online games, smileys, eCards and IE skins). To disable the Pop-Up Blocking feature in the Crawler Toolbar:
MSN Toolbar
AOL Toolbar
To stop the Pop-Up Blocking feature in AOL Toolbar, click on the Pop-Up Blocker in the toolbar Ask Toolbar with Popswatter
To disable the PopSwatter popup blocker in the Ask Toolbar:
To configure PopSwatter to allow pop-ups on selected sites such as reftown.com:
Ask.com, FunWebProducts, MySearch Toolbar/browser add-onThe Ask.com, FunWebProducts, or MySearch toolbar/browser add-ons are embedded in many FREE downloadable products (such as Smiley Central, Cursor Mania, My Mail Signature, My Mail Stamp, and Popular Screensavers). These toolbars may then be activated whenever a new browser window is opened automatically—such as when viewing linked MLS documents, IDX search screens, tutorial movies, or calendars. To remove the Ask Toolbar from Internet Explorer:
To remove the Ask Toolbar from Firefox:
If you continue to experience problems with the Ask.com, FunWebProducts, or MyWebSearch browser add-on (after completing the above removal steps): | ||

 in the toolbar to allow pop-ups on this site
  , or
, or 

 .
.


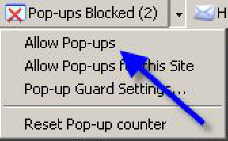

 to toggle it to allow pop-ups
  .
.
Add RefTown to Your Safe Senders List | ||||||||
| Article ID:184 | Posted:9/22/2010 12:15:00 AM | Updated:2/27/2024 1:25:02 PM | ||||||
Because all IT departments are different, and spam filters sometimes filter legitimate email, it is highly recommended that you add the RefTown domain to your Safe Senders list in your email client. This will help ensure that our emails will get to you safely. Either add the entire @reftown.com domain to your safe sender's list (if your email program allows adding domains) or add the email address mailer@reftown.com (Another site that may also be useful for configuring your email settings for RefTown emails: Safe Sender List How To)
Add known valid sender to the Safe Senders list to ensure that their email will not go to your Junk E-mail folder.
| ||||||||


Add RefTown to Your Safe Senders List (for Gmail) | ||
| Article ID:234 | Posted:12/20/2017 4:14:40 PM | Updated:8/1/2025 9:07:18 PM |
Because all IT departments are different, and spam filters sometimes filter legitimate email, it is highly recommended that you add the RefTown domain to your Safe Senders list in your email client. This will help ensure that our emails will get to you safely. This page covers how to do so for Gmail...
| ||


SETUP: Overview | ||
| Article ID:97 | Posted:4/21/2008 6:24:32 PM | Updated:6/23/2010 12:58:22 AM |
SETUP: OverviewThere are several steps you will need to take in order to set up RefTown for your organization. Among them, you will need to set up various options, configure basic data, and input officials, team, and location roster. Below is a good way to approach setting up your data. For most settings, you can return to the configuration page and make changes at any time.
While there are several more functions on the site, this concludes the initial setup. You’re now ready to start adding games and making assignments. | ||
Common Assignor Profile Changes | ||
| Article ID:335 | Posted:4/5/2026 11:44:35 AM | Updated:4/5/2026 11:44:35 AM |
The default views are primarily for individual officials and not assignors. There are a few profile changes that may function better for those making assingments.
There are other default changes you can select here that change the format of the listings...but those are rarely used as a default. | ||
SETUP: Basic Information | ||||||||||||||||||||||||
| Article ID:98 | Posted:4/21/2008 6:42:14 PM | Updated:2/7/2016 2:50:42 AM | ||||||||||||||||||||||
Under Basic Information, you will set up the following:
| ||||||||||||||||||||||||
SETUP: Organization Contacts | ||
| Article ID:83 | Posted:6/5/2007 10:14:27 AM | Updated:4/16/2013 9:36:37 PM |
The contacts page provides access to some of your most commonly contacted people. RefTown provides a contact page that is accessible, in part, to the public, and more fully available to schools, teams, and officials. For each person listed on the contacts page, you can specify a Title (e.g., Commissioner, Webmaster, Recruiter, etc.). For each of these individuals, you can also specify exactly what pieces of contact information to list on the contact page. You can specify a different set of contact information to be revealed for the public than for officials, schools, and teams. For example, you could reveal only a single email address to the public, while revealing mailing addresses, phone numbers, and all email addresses to logged-in users. To set up your contacts, go to "Public" -> "Contact," then:
| ||
SETUP: Menu Control | ||
| Article ID:183 | Posted:6/23/2010 1:05:45 AM | Updated:6/23/2010 1:05:45 AM |
The items under Menu Control can be used to block access to certain pages if your organization doesn't make use of those pages or you wish to only have those pages available to administrators. | ||
SETUP: Organization Logo/Banner | ||
| Article ID:99 | Posted:4/21/2008 6:51:24 PM | Updated:2/7/2016 2:52:46 AM |
Under Association Logo, you can upload your own logo to replace the RefTown logo in the upper left corner of all pages. Under Association Banner, you can upload an image that will be located across the page just below the title area.
| ||
SETUP: Notice Recipients | ||||||||||||||||||||
| Article ID:165 | Posted:12/7/2009 3:44:00 PM | Updated:4/16/2013 9:36:37 PM | ||||||||||||||||||
Under notice recipients, you define who shall receive basic automatic emails triggered by actions on RefTown. Below are the available categories and what causes them to be sent:
To add a person to one of these groups:
To remove a person from one of these groups:
| ||||||||||||||||||||
SETUP: Email Reminders for Officials | ||
| Article ID:166 | Posted:12/7/2009 9:48:04 PM | Updated:6/22/2010 12:25:40 PM |
|
Game reminders can be configured to be sent to official through a flexible set of options. The available options offer the the ability to send a reminder 48 hours before a game, 72 hours before a game, the day of a game, twice a week, weekly—just about any combination you might prefer. Notices are sent at approximately 3 a.m. Pacific. To set reminders for Officials, select the days of the week that reminders will be sent on. Under “Include Games Starting on,” enter the number of days from the day of the notice to start including games. Under “For This Many Days,” enter the number of days of games to include in the notice. EXAMPLES: For a 48-hour notice, check all days, and enter 1 for “Include Games Starting on” and 1 for “For This Many Days.” For a 72-hour notice, check all days, and enter 2 for “Include Games Starting on” and 1 for “For This Many Days.” For a weekly notice starting with games on the day of the notice check, check ONE day, and enter 0 for “Include Games Starting on” and 7 for “For This Many Days.” For a weekly notice starting with games the day after the notice, check ONE day, and enter 1 for “Include Games Starting on” and 7 for “For This Many Days.” To have automatic new game reminder sent on the days checked above, select “New Games.” | ||
SETUP: Email Reminders for Schools/Teams | ||
| Article ID:167 | Posted:12/7/2009 9:48:48 PM | Updated:6/22/2010 12:26:06 PM |
Game reminders can be configured to be sent to officials through a flexible set of options. The available options offer the the ability to send a reminder 48 hours before a game, 72 hours before a game, the day of a game, twice a week, weekly—just about any combination you might prefer. Notices are sent at approximately 3 a.m. Pacific. To set reminders for officials, select the days of the week that reminders will be sent on. Under “Include Games Starting on,” enter the number of days from the day of the notice to start including games. Under “For This Many Days,” enter the number of days of games to include in the notice. By default, schools reminders are sent to the listed Payor of the game. These reminders can also be sent to other parties involved in the game. You can specify that the reminders should also be sent to any or all of the following: Home Team, Visiting Team, or Location. By default, reminders are only sent to teams that have games as specified above. However, you can cause reminder to be sent to all teams on your roster whether they have games or not by selecting “Copy To All Schools/Teams.” This would also cover the possibility that a team is missing a set of games in a given time. These notices are only sent when there are active games for some team in the specified time frame. EXAMPLES: For a 48-hour notice, check all days, and enter 1 for “Include Games Starting on” and 1 for “For This Many Days.” For a 72-hour notice, check all days, and enter 2 for “Include Games Starting on” and 1 for “For This Many Days.” For a weekly notice starting with games on the day of the notice check, check ONE day, and enter 0 for “Include Games Starting on” and 7 for “For This Many Days.” For a weekly notice starting with games the day after the notice, check ONE day, and enter 1 for “Include Games Starting on” and 7 for “For This Many Days.” To have automatic new game reminder sent on the days checked above, select “New Games.” | ||
SETUP: Admin/Assignor Game Status Reminders | ||
| Article ID:168 | Posted:12/7/2009 10:02:10 PM | Updated:6/22/2010 12:26:30 PM |
This set of reminders is for administrators/assignors. The reminder includes a snapshot of the Game Management summary page. To enable reminders, select the days of the week that reminders will be sent on. Under “Include Games Starting on,” enter the number of days from the day of the notice to start including games. Under “For This Many Days,” enter the number of days of games to include in the notice. EXAMPLES: For a 48-hour notice, check all days, and enter 1 for “Include Games Starting on” and 1 for “For This Many Days.” For a 72-hour notice, check all days, and enter 2 for “Include Games Starting on” and 1 for “For This Many Days.” For a weekly notice starting with games on the day of the notice check, check ONE day, and enter 0 for “Include Games Starting on” and 7 for “For This Many Days.” For a weekly notice starting with games the day after the notice, check ONE day, and enter 1 for “Include Games Starting on” and 7 for “For This Many Days.” A few of the checks on the Game Management page will be made without regard to date (e.g., checks for unusual dates/times or checks for missing details). | ||
SETUP: Officials Directory - Profile Display/Edit Options | |||||||||||||||||||||||||||||||||||||||
| Article ID:100 | Posted:4/21/2008 7:18:34 PM | Updated:8/12/2021 10:30:00 AM | |||||||||||||||||||||||||||||||||||||
For the officials roster, you have the following options:
| |||||||||||||||||||||||||||||||||||||||
SETUP: Officials Directory - Official Levels | ||
| Article ID:101 | Posted:4/21/2008 7:24:58 PM | Updated:8/12/2021 8:39:31 AM |
This is a list of the various member types your organization uses to classify its members. As part of this list, you can give officials in each category a "Rating." Examples of possible rating levels include Probationary, Regular, Certified, Associate, Registered, etc. This is a coarse level rating that can be used in making assignments�if you have the rating feature for assigning enabled. The order established in this list will be used in any dropdown lists throughout RefTown. In the case of a multi-sport organization, a different level can be specified for each sport. To enable this option, go to Admin -> Configuration - Finances. In the officials section, click on "Fee Calculation Options". Check " Then, to use this feature...
| ||
SETUP: Officials Directory Privacy Options | ||
| Article ID:169 | Posted:12/7/2009 10:39:05 PM | Updated:8/12/2021 8:39:45 AM |
Each element of the officials roster can be configured to one of the following options:
| ||
SETUP: Officials Registration Options | ||||||||||||||||||||||||||||||||||||
| Article ID:170 | Posted:12/7/2009 10:40:51 PM | Updated:6/23/2010 1:13:06 AM | ||||||||||||||||||||||||||||||||||
Under this section, you can enable a few extra fields on the Registration form that are not included by default and can also define which fields are required versus optional.
| ||||||||||||||||||||||||||||||||||||
SETUP: Official Qualification Options | ||||||||||||||
| Article ID:273 | Posted:8/11/2021 11:05:38 PM | Updated:9/3/2025 10:19:32 PM | ||||||||||||
| ||||||||||||||
Managing Official's Sports, Zones, and/or Duties. | ||
| Article ID:275 | Posted:8/11/2021 11:29:45 PM | Updated:8/11/2021 11:30:52 PM |
When the option to tag officials with Sports/Zones/Duties is enabled, you can manage these items in a couple of ways. The first option is to edit selected officials from the directory. Steps:
The next option is to edit blocks of officials or all officials at one time. Steps:
Both of these paths ultimately do the same thing but target different groups of officials. On the page to edit the Sports for officials, you'll also have an option to specify a different membership level for each official for each sport. On the pages to edit the Sports/Zones/Duties, you will find several aids that may expedite the configuration. At the top of each column, you'll will find a check-all and a clear-all button. Selecting one of those will check (or clear) all of the boxes in that column. Similarly, in each row (for each official) will be the same pair of buttons. With those, you can check (or clear) all Sports/Zones/Duties for that official. This can make it a lot quicker if an official need to have all (or most) items checked. Also at the top of the page will be controls to show either blocks of 25 officials or the entire roster. For very large rosters, the page can become quite unwieldy when the entire roster is shown with multiple sports/zones/duties. Uniquely for duties is an option to declare one or more duties as universal. This simplifies the configuration when there may be some duties that every official is qualified for. The designation of "universal duty" is done on the duty configuration. That option only appears when the option to specify specific duties is enabled. | ||
SETUP: Schools, Locations, Payors, and Teams - General Options | ||||||||
| Article ID:102 | Posted:4/22/2008 12:15:47 AM | Updated:6/23/2010 1:14:05 AM | ||||||
For the schools, locations, payors, and teams roster, there is only one option on RefTown at this time:
| ||||||||
SETUP: Schools, Location, Payors, and Teams - Leagues & Levels | ||
| Article ID:105 | Posted:4/22/2008 12:37:39 AM | Updated:4/21/2025 4:25:43 PM |
School/Team Leagues is a list of the various school/team leagues your organization serves. This is generally used to classify schools/teams into conferences/leagues but not individual teams associated with a school.
School/Team Levels is a list of the various school/team levels your organization serves. This is generally used to classify schools/teams into very large categories but not conferences/leagues or individual teams associated with a school.
You can give each level on each list a "Rating." This rating is a part of the equation you can use to calculate a game rating to use in making assignments if you have the rating feature for assigning enabled. The order established in each list will be used in any dropdown lists throughout RefTown. | ||
SETUP: Schools, Location, Payors, and Teams - Gym/Field Details | ||
| Article ID:106 | Posted:4/22/2008 12:41:10 AM | Updated:6/21/2010 11:51:23 PM |
This is a list of general supplementary data used to identify the specific location of an event at a larger facility. Use generic terms where possible to maximize reuse. Examples include: Field 1, Field 2, Back Gym, Main Field, etc. This is NOT intended to be used as a list of primary locations. The primary locations (with addresses) will be entered under the location/school/team roster. | ||
SETUP: Schools, Location, Payors, and Teams - School/Team Roles | ||
| Article ID:103 | Posted:4/22/2008 12:30:07 AM | Updated:6/23/2010 1:15:33 AM |
This is a list of the various member types of individuals associated with schools and teams. Examples of possible levels include Coach, Athletic Director, Secretary, League AD, etc. These titles are used to associate the school/team personnel with the schools/teams—a single person can be affiliated with one or more schools/teams and a single school/team can be associated with one or more individuals in various roles. The order established in this list will be used in any dropdown lists throughout RefTown. The association between personnel and the schools/teams is done elsewhere...this only configures the types of roles. | ||
SETUP: School Contact Privacy Options | ||
| Article ID:171 | Posted:12/7/2009 10:45:21 PM | Updated:6/22/2010 12:27:27 PM |
|
Each element of the school contact roster can be configured to one of the following options:
All elements are always visible to administrators. | ||
SETUP: School Contact Registration Options | ||
| Article ID:172 | Posted:12/7/2009 10:46:30 PM | Updated:6/22/2010 12:27:50 PM |
Under this section, you can enable a few extra fields on the Registration form that are not included by default and can also define which fields are required versus optional. | ||
SETUP: Games - Display Options | ||||||||||||||||||||||||||||||||||||
| Article ID:107 | Posted:4/22/2008 12:47:11 AM | Updated:6/23/2010 1:21:24 AM | ||||||||||||||||||||||||||||||||||
| ||||||||||||||||||||||||||||||||||||
SETUP: Games - Error Check Options | ||||||||||||||||||||||||||
| Article ID:111 | Posted:4/22/2008 1:18:13 AM | Updated:6/21/2010 11:53:32 PM | ||||||||||||||||||||||||
| ||||||||||||||||||||||||||
SETUP: Games - Availability Options | |||||||||||||||||||||||||||||
| Article ID:108 | Posted:4/22/2008 12:58:51 AM | Updated:11/7/2017 2:52:41 PM | |||||||||||||||||||||||||||
| |||||||||||||||||||||||||||||
SETUP: Games - Assignment Options | ||||||||||||||||||||||||||||||||||||||||||||||
| Article ID:110 | Posted:4/22/2008 1:13:05 AM | Updated:6/23/2010 1:54:43 AM | ||||||||||||||||||||||||||||||||||||||||||||
| ||||||||||||||||||||||||||||||||||||||||||||||
SETUP: Games - Response Options | ||||||||||||||||||||||||||||||||||||||||||||||
| Article ID:109 | Posted:4/22/2008 1:05:35 AM | Updated:7/16/2025 7:50:57 AM | ||||||||||||||||||||||||||||||||||||||||||||
| ||||||||||||||||||||||||||||||||||||||||||||||
SETUP: Games - School Options | ||||||||||||||||||||||||||||
| Article ID:173 | Posted:12/7/2009 10:49:47 PM | Updated:6/22/2010 12:28:17 PM | ||||||||||||||||||||||||||
| ||||||||||||||||||||||||||||
SETUP: Games - Other Options | ||||||
| Article ID:112 | Posted:4/22/2008 1:19:46 AM | Updated:6/21/2010 11:53:53 PM | ||||
| ||||||
SETUP: Games - Parameters: Types, Levels, & Leagues | ||
| Article ID:115 | Posted:4/22/2008 1:24:56 AM | Updated:6/21/2010 11:54:14 PM |
1. Sports (if enabled) are a list of the various sports your organization serves. 2. Leagues are a list of the various game leagues your organization serves. This is generally used to classify games into general categories. Examples of possible levels include High School, College, Rec League, etc. 3. Types are a list of the various game types your organization serves. This is generally used to classify games into genders. Examples of possible types include G, B, M, W, Co-Ed, etc. 4. Levels are a list of the various game levels of games your organization serves. This is generally used to classify games into competitive levels. Examples of possible levels include Varsity, JV, U12, U16, 14U, 7th, etc. This is also often used to indicate double headers: "JV+V," "7/8," etc. As part of each list, you can give each type a "Rating." This rating is a part of the equation used to calculate a game rating to be used in making assignments—if you have the rating feature for assigning enabled. The order established in each list will be used in any dropdown lists throughout RefTown These are only a few examples of how these lists can be used. Other options are possible, but the suggested uses work best for most organizations. The order you choose for these lists will be the order the items appear through out the remainder of the site. | ||
SETUP: Crews - CrewTypes, Duties, and Crew Duties | ||
| Article ID:116 | Posted:4/22/2008 1:31:04 AM | Updated:1/25/2018 10:19:40 PM |
The CrewTypes list on RefTown is where you list all the possible crewtypes your organization uses: 1-person, 2-person, 5-person, etc. You can also give your crews names that indicate a style of crew rather than just the number of people involved. The Duties list is where you list all the possible crew duties utilized in your organization. As part of this list, you can give each crewtype/duty a "Rating" (if the rating feature is enabled). This rating is a part of the equation used to calculate a game rating to be used in making assignments. The orders established in these lists will be used in any dropdown lists throughout RefTown The "Crew Duties" page is where to define the relationship between the "Crew Types" and the "Duties," By each crew, check each duty that is part of that crew. To add a new crew type:
| ||
SETUP: Zones | ||
| Article ID:218 | Posted:10/15/2016 11:56:48 PM | Updated:10/15/2016 11:56:48 PM |
Reftown's Zone feature allows you to designate locations to be in your own customizable list of "Zones" and to designate officials as eligible to work in any number of those zones. As with all other assignment restrictions, an assignor can override the zone restrictions if desired. There are 3 parts to setting up the use of zones:
| ||
SETUP: Finances: Basic Configuration | ||
| Article ID:145 | Posted:10/15/2008 12:30:16 AM | Updated:8/20/2019 8:59:24 AM |
SETUP: Finances - Basic ConfigurationThe configuration for officials and schools finances are completely separate. However, they work the same in nearly every aspect. Throughout the configuration of the finance options, you can place your cursor over the question mark symbol ( STEP 1: Enable the desired feature.
For officials finances, you can also enable the game fees to be listed on the game schedule. STEP 2: Define how the basic game fees are determined.In this step, you'll be defining the pieces of information that will be used to differentiate the amount to be paid for each type of game. This may include information about the game itself, the crewtype assigned to the game, the duty of the official assigned to the game, and the participants in the game. Getting this step correct will, for some organizations, require the most thought. It may require changes in how your enter and define games if there is not enough detail in the game data to determine the amount to be paid. Additionally, all fields you select must actually be entered for every game/school/official. (NOTE: The invoice creation process verifies that all games include all necessary fields and provides a method to add any missing information.)
Note: For schools, you need not normally make the assignments to generate the school invoices. In a few situations, you might be finished at this point. STEP 3: Define and enable adjustment optionsUnder adjustment options, you can define how the game fees are treated based on the game counts and define up to 3 categories of other adjustments that may depend on the game fee. Examples of this might be a percentage taken from each game as an assignors fee. The first setting is to enable a per-duty multiplier (not frequently used). This can be used to handle situations where each official on an assignment might perform a different number of events (i.e., volleyball tournaments). The effect of the number entered is to multiple the game fees by the multiplier. The second option defines whether the game count will affect payroll as a multiplier. Also at this point, you will enable and name any adjustments to be applied to your invoices. An adjustment category is enabled merely by giving it a name. Note that it is not necessary for any specific adjustment be applied to all games. The amount of the adjustment is configured separately and can have different values for different kinds of games.
STEP 4: Define and enable basic mileage adjustmentsIn this step, you'll define the basic mileage payment methods. The actual amounts paid can vary based on the criteria defined in step 2 and will be set up later.
| ||
SETUP: Finance: Adjustments and Mileage | ||
| Article ID:147 | Posted:10/15/2008 1:21:35 AM | Updated:8/20/2019 9:28:28 AM |
RefTown supports the definition of multiple sets of adjustments and travel options. You can predefine as many variations as needed: different mileage rates, different methods of calculating mileage, different adjustment amounts, etc. Each adjustment set can be use with one or more items on the fee table. In many cases, only one adjustment set needs to be defined. In a few cases no adjustment set needs to be defined. The adjustment recipes and travel recipes are tied together but are entered on separate screens. Adjustments
Travel
Additional help can be found by putting your mouse over the | ||
SETUP: Finance: Advanced | ||
| Article ID:146 | Posted:10/15/2008 12:58:43 AM | Updated:8/20/2019 9:32:05 AM |
The configuration for officials and schools finances are completely separate. However, they work the same in nearly every aspect. Under Admin -> Configuration - Fiances, then Advanced Invoice Options, there are several general options that affect how the overall feature works. Safety Overrides
Other Invoice Options
Quickbooks OptionsReftown supports the exporting of financial information to Quickbooks. In this section, you will define how the data is to be exported.
| ||
SETUP: Pay Scale | ||
| Article ID:148 | Posted:10/21/2008 5:01:05 PM | Updated:8/20/2019 9:36:18 AM |
Payscales can be set up in two ways: manual and semi-automatic. Both modes require that any needed adjustments and travel options be previously configured. 1. ManualThis method can be used to add new items to the payscale, but is not nearly as efficient the semi-automatic method
2. Semi-Automatic There are two methods that are semi-automaticl
In this mode, the amounts to be added to the payscale are generated in the process of creating an invoice. During the invoice generation process, you'll be asked for the amount to be paid and the adjustments to be made for any game type that is not found in the payscale. Amounts entered will be stored for use with any other game of the same type. When you use this method, you don't have to think of the possible combinations that can occur�the invoice process will detect all actually used combinations. | ||
Configuring Reftown to Use the Paysheet System | ||
| Article ID:215 | Posted:10/13/2016 3:34:38 AM | Updated:10/13/2016 3:35:30 AM |
Note that some of these steps may already be done in your setup
| ||
SETUP: Interactive Forms | ||
| Article ID:124 | Posted:4/22/2008 9:42:57 PM | Updated:4/25/2017 8:10:57 PM |
Types of Interactive Forms RefTown supports several types of interactive forms:
All form submissions are, by default, archived on RefTown. If desired, the archiving of the submissions can be disabled for each form if there is at least one designated email recipient. Registration forms
Game Reports
Evaluation/Observation Forms
Ejection Forms, Sportsmanship Form, & Payroll Error Form
NOTE: The email addresses for the recipients of forms are drawn from the current roster at the time of a form submission. There is never a need to change the form configuration unless you want a different person to receive the form. Previewing Available Forms We have a number of forms already created and available for your use. You can browse these forms to see if one meets your needs or comes close to what you need.
If you see one you like, note its number to use in setting up your form. If you can't find one that fits your needs, let us know and we can make a new one. Let us know which one of the available forms is similar to what you need if there is such a form Enabling an Interactive Form
| ||
About archives, Creating Archives, and Deleting Archives | ||
| Article ID:162 | Posted:10/13/2009 7:00:31 PM | Updated:9/24/2025 9:45:17 PM |
Archives contain a frozen snapshot of an organization's data allowing a user to view the organization's information as if it were the date the archive was made. To create an archive of your current data (administrators only):
To add a custom name to an existing archive (administrators only):
To delete a previously created archive (administrators only):
IMPORTANT NOTES REGARDING ARCHIVING If you use RefTown's invoicing features AND plan to use RefTown's 1099 services, you must ensure that your settings of what should and should not be included in the 1099 amounts are correct prior to creating the archive. | ||
How does the RefTown registration process work? | ||
| Article ID:176 | Posted:12/28/2009 1:14:06 PM | Updated:6/22/2010 12:30:05 PM |
For registrations submitted by someone who is not logged in, the form will be placed into a pending status where an administrator can either reject or approve the registration. When approving the registration, there are two options:
If the form is submitted by someone who is already logged in, it will update that person’s roster entry with the information as entered on the registration form and will mark that person’s status as “registered.” In the off-season, you can clear the "registration" status of your current officials. It does nothing except for clearing that status bit. You can then request that each person log into their account and fill out the registration form—in order to determine who is returning and who is not. | ||
Using the Meeting/Event Calendar | ||
| Article ID:178 | Posted:1/6/2010 10:04:37 PM | Updated:7/10/2020 11:39:19 AM |
The meeting event calendar can be used to post organization meetings, training, and various events other than games. Information about the item can include date, time, location, and general details. By default, the meeting/event list will show only recent and future items. All items can also be access through a "Show All Dates" that will appear at the top of the listing. Attendance can also be recorded with each meeting/event. The following symbols are used for attendance:
The next 3 events (a programmable number) on the calendar will also be listed on the site homepage. To add a new meeting/event, click the To edit an existing meeting/event, click the checkbox for the desire item, then click the To delete an existing meeting/event, click the checkbox for the desire item, then click the ATTENDANCE To edit the attendance for an event, you have three options:
| ||
Remote Self Check-In | ||
| Article ID:239 | Posted:7/10/2020 11:37:18 AM | Updated:2/24/2023 4:31:55 PM |
Remote Self Check-In is a way to verify attendance in remote/teleconference meetings using RefTown's Meeting/Event schedule. In summary, you enable a meeting for Remote Check-In. During the meeting, a present provides a 4-digit code to the attendees to enter into a check-in window on RefTown. That will record the person as present at that moment. The Remote Check-Ins can be done up to 4 times to verify continued attendance for longer meetings. PRE-MEEETING SETUP
IN-MEETING CHECK-IN
You can repeat this up to 3 more times throughout the meeting to ensure continued attendance. POST-MEETING PROCESSING
| ||
On-Site / Location-Based Self Check-In | ||
| Article ID:241 | Posted:7/10/2020 12:07:55 PM | Updated:7/10/2020 12:12:33 PM |
On-Site / Location-Based Self Check-In is a feature that allows officials to check themselves in to a meeting/event based on their location as determined by the location functionality in a phone, tablet, or other device. PRE-MEEETING SETUP
IN-MEETING CHECK-IN
POST-MEETING PROCESSING The on-site check-in directly records an official as present for the meeting. There is no additional action needed by an administrator. However, an administrator may revise the attendance information as needed. NOTES:
| ||
Add officials to the database | ||
| Article ID:125 | Posted:4/22/2008 10:30:25 PM | Updated:3/16/2021 8:26:04 PM |
There are two ways to add officials to your RefTown database:
For large numbers of officials, the import method can be the most efficient. To add an official directly on the website, one at a time:
To add multiple officials by importing from an .xls/.xlsx file
| ||
How does an administator edit an official's information? | ||
| Article ID:34 | Posted:4/25/2007 7:29:17 PM | Updated:4/16/2013 9:36:37 PM |
To edit one or more official(s):
Selecting more than one official in step 2 is the most efficient way to edit multiple officials. | ||
How do I add photos to the officials roster? | ||
| Article ID:18 | Posted:4/24/2007 11:39:40 PM | Updated:6/21/2010 10:31:29 PM |
Organizations have the option to enable officials to upload their own photos or to have administrators upload the photos. To upload photos:
| ||
Can more than one account share the same email address? | ||
| Article ID:48 | Posted:4/25/2007 10:46:08 PM | Updated:6/21/2010 11:10:03 PM |
Yes. Multiple accounts (Officials, School/Teams/Locations/Payors, or School/Team Contacts) can share the same email address. If the same address is used multiple times, each person will have access to the others’ information and will also have the same username and password. | ||
How do I enable my association for online registration? | ||
| Article ID:88 | Posted:6/5/2007 10:38:57 AM | Updated:4/16/2013 9:36:37 PM |
|
To enable online registration for your organization:
| ||
How do I manage officials registration forms? | ||
| Article ID:87 | Posted:6/5/2007 10:34:36 AM | Updated:12/12/2020 11:31:12 PM |
Registration forms filled out by logged-in officials automatically update their roster entries. For users who are not logged in at the time of filling out the registration form, the information is stored in a "Potential Members" list. There are two ways to get to pending registrations:
On that page, you can
| ||
How can I keep track of who has registered for the current season? | ||
| Article ID:68 | Posted:4/27/2007 12:49:20 AM | Updated:12/13/2020 12:09:49 AM |
After clearing your previous season's registration status through the the new season setup page, you can have your officials fill out the online registration form (if enabled). This will mark them as registered on the roster.
From the email page, you can choose to send an email to only those who have not registered to remind them to log in and register for the new season. | ||
What happens when I delete an official? | ||
| Article ID:138 | Posted:6/19/2008 12:43:55 AM | Updated:6/22/2010 11:32:43 AM |
When you attempt to delete an official, several things are done:
| ||
How to copy a roster entry from one type of roster to another or from one association to another. | ||
| Article ID:177 | Posted:1/6/2010 1:09:23 AM | Updated:4/16/2013 9:36:37 PM |
To copy an official to the school/team contact roster or to copy a school/team contact to the officials roster, do the following:
This also works between association/organizations if you are an administrator in both. | ||
How do I manage ratings for officials? | ||
| Article ID:188 | Posted:8/16/2011 3:10:54 PM | Updated:8/3/2024 3:05:31 PM |
There are two ways to edit the ratings for officials....individualy or for you entire group. To edit a single official's rating
To edit your entire group of officials
Ratings can also be managed by exporting the roster to Excel, updating the ratings column, then importing the modified spreadsheet back into Reftown. | ||
What happens when I add an official and how do they get their account log information? | ||
| Article ID:193 | Posted:12/7/2011 11:58:30 PM | Updated:4/21/2021 4:52:15 PM |
If you add officials (or school/team contacts) directly on the website roster and include a primary email address, the official (school/team contact) will automatically recieve two emails. One will be a RefTown welcome letter giving them an overview of the RefTown system. The second will include their username and a link through which they can establish a password.. To notify them, you have a few options.
| ||
What status can an official's account be in? | ||
| Article ID:197 | Posted:10/12/2012 12:41:42 AM | Updated:10/12/2012 12:41:42 AM |
An officials account can be placed in one of 3 options....
| ||
How do I merge duplicated roster entries? | ||
| Article ID:200 | Posted:10/30/2013 3:32:57 PM | Updated:12/21/2025 1:51:02 PM |
In the event you end up creating more than one roster entry for the same person or team, you can use the merge feature to blend the two entries into a single entry. This operation will move all games associated with both entries to be associated with the one combined entry. Other secondary data, such as permissions and scratches and availability will be merged. In the event of conflicting information in the two availability calendars, only one calendar will effectively be saved. To merge to duplicates, you must first location the two so that they appear on the same screen. Some duplicates can be found using the "Show Duplicates" report under the Quick Links menu for each roster type (Officials, Schools/Teams, or School/Team Contacts). You can also use the search form on each of these pages to search for a part of the name that is common to both entries. It may also be easier if you edit one of the two entries to have a name similar to the other (e.g. School ABC and School ABC 1). It is possible to merge more than two down to a single entry. There is technical no limit on how many duplicates you can select to be combined at one time but it may be easier if you only merge 2-3 to 1. Once you have the duplicate entries listed, click both entry's selection checkboxes. Then click the merge button: This will open a new page that will list each of the entries, one per column. If the type of data is not the same between the entries, you will have a choice of which data to keep in the final entry. Once you have selected the data you wish to keep, click "Merge" at the bottom of the form. If you need to locate duplicate entries, you can do so using a special report under the relevant directory within the Quick Links Menu. In the officials directory, it will be in Quick Links -> Roster Management -> Duplicate Names. | ||
How do I add/upload multiple photos to the officials roster? | ||
| Article ID:227 | Posted:5/27/2017 11:25:07 AM | Updated:8/1/2025 9:07:18 PM |
If you have several photos of officials to add to the roster, the best option is a bulk upload where you add all of the photos to the site then match the photos to the correct officials. First, you�ll need to upload the photos�
Next, you need to match the uploaded photos to the right officials.
Note, you can match just one photo at a time or many at a time. We recommend matching 5-10 and then saving. As you save a few, the list photos to work with will be reduced, making it easier to manage. | ||

Custom Roster Fields (Schools or Officials Old Version) | ||
| Article ID:230 | Posted:9/20/2017 12:03:17 AM | Updated:4/27/2021 12:56:04 AM |
NOTE: The "Officials" version of this feature is deprecated. The Schools/Team version is still available. Existing users may still make use of it but it will be removed at some future date. Those who have never used this function will not have access to it. A replacement function exists allowing unlimited numbers of custom fields with greater configuration options. RefTown offers several customizable roster fields. Those fields can be programmed to control who can see the information and who can edit the information, and whether the field has any bearing on assignments. Currently, we offer 5 each of the following types of fields (Dates, Yes/No Checkboxes, Numerical, and General Text). These custom fields are available for both officials and for schools/teams. To enable one or more of these fields,
| ||
Custom Roster Fields (Officials New Version) | ||
| Article ID:271 | Posted:4/27/2021 12:54:50 AM | Updated:4/27/2021 1:15:12 AM |
RefTown offers customizable roster fields. Those fields can be programmed to control who can see the information, who can edit the information, and whether the field has any bearing on assignments. To configure the fields:
There are several ways to Access or Enter Data:
From a listing of all of the fields, click on either the field name or the Record Count to see a listing of all who have info for that field. From there you can search for entries based on several criteral or add or delete more entries for that field. From a listing of all fields for a single official, click on the value column to add a new value or edit an existing value for that person. This data can also be viewed on the main officials directory and exported/imported along with the directory. To show certain data
The selected fields will be show in a new column for each official. If the field is not listed for an official, no value has been set for that official. Additional Usage Tips
| ||
Configuring and Managing Registration Payment | ||
| Article ID:295 | Posted:6/9/2022 12:25:57 PM | Updated:6/9/2022 12:34:51 PM |
To enable payments related to officials registrations, assuming you have already enabled a registration form...
One you have registrations in place, you can filter the pending registrations by payment status and selectively accept those that have paid. | ||
How to send a password reset email to Officials | ||
| Article ID:307 | Posted:1/2/2023 11:33:21 AM | Updated:1/2/2023 11:37:28 AM |
You have 3 options for sending password reset emails to officials.
To Send to An Individual
NOTE: This is automatically done when you add a new official through the web interface, but not if you add officials through an excel import. To Send to All Active Officials who have never logged in:
To Send to All Active Officials who have never logged in:
NOTES:
| ||
Syncing License/Certification Information with External Systems | ||||||||||||
| Article ID:321 | Posted:9/2/2024 9:57:18 PM | Updated:9/8/2024 4:36:47 PM | ||||||||||
Reftown has the ability to synchronize certification/license data with external systems. Reftown Syncs with:
The synchronization of license info for both systems depends on matching up the officials between the two systems. Each organization can be programmed to match on a variety of criteria, up to 4 different elements. Matches can be made using the following:
Some organizations require a match on all 4 lines. Some allow for a "3-point" match. A "3-point" match includes Email, Last Name, and either a First Name/Nickname match OR a Date of Birth match. Some organizations may even choose to allow a less precise match using as little as the email address. Note that capitalization does not matter. The actual letters, numbers, punctuation, and spacing does matter. If your account is not matching the USSF/Arbiter system, you will need to update your profile on one of the systems to match the information in the other. It doesn't matter which one you update. Note that updates in the external systems may not immediately be available to Reftown. Please allow for a few hours for the changes to appear. An official see the status of his or her licenses and registration under their profile by clicking their name in the top right, then "My Profile". The information is in the section for "My Qualifications". USSF Name or Date of Birth Updates: https://ussoccerfederation.my.site.com/lcsupport/s/article/Change-Profile-Page-Name-and-Date-of-Birth | ||||||||||||
Syncing and Managing Officials Between Reftown and USSF | |||||||
| Article ID:327 | Posted:1/19/2025 7:48:33 PM | Updated:8/1/2025 9:07:56 PM | |||||
Reftown can now sync license data from USSF. If you have an official on your directory that has been matched to an person on the USSF system, their license data will be updated almost instantly after any change. For a person to match, a few things must be true:
Some organizations may relax the requirements on how many of these items must match. Once those match, the records on USSF will be linked to their account in your organization. To get them to match, you (or the official) can edit their info on Reftown to match USSF. Or, the official can edit their info on USSF to match Reftown. When the information is edited on Reftown, a match is automatically attempted. When the information is edited on USSF, you will have to force a match attempt from Reftown since Reftown will have no way to know a change has been made. To see your match status for all officials in your organization..
You will see something like this:
Looking at the 2nd line, you can see:
You can click on the number to see who those people are. Further, you can see how many officials you have or do not have relative to your Super Org (if you are part of a Super Org). You can also see how many officials currently have assignments but are not fully certified. Requirements to be Certified:
Special note for Washington: Washington does not upload background check or safe sport data to USSF but will not renew an official's referee license without renewing those items. It is assumed that, if a person has a valid Washington Referee license, they also have the other items. From the officials directory search form, you have options to search for officials base on any part of their license info under "USSF Data". You can have the license info, in varying degrees of detail, shown on the directory by clicking one of the following buttons in the search form: | |||||||


Invite Officials to Join Your Organization | ||
| Article ID:332 | Posted:8/16/2025 11:02:24 AM | Updated:9/8/2025 7:57:33 PM |
You can easily invite officials to join your organization by having the site send them a direct link to your registration form. (NOTE: This only works if you have a registration form enabled...which is the case by default). There are a few ways to get there....
Once on the registration invite page:
Multiple email addresses can be entered. They must be separated by one of the following:
| ||
Address Errors for Officials / Locations...unable to identify latitude and longitude | ||
| Article ID:334 | Posted:11/5/2025 9:18:54 PM | Updated:11/5/2025 9:19:22 PM |
When you have an official or game location where the address indicates an error and the system is unable to identify the latitude and longitude, there could be several reasons. First, double check the address, including the spelling of the street and city as well as the zip/postal code. If the error remains, you can manually enter the latitude and longitude for the location. Steps to manually add latitude and longitude information for an official / location:
Hawaii and Alaska will be outside of these ranges.
| ||
Add locations, schools, teams, and/or payors to the database | ||
| Article ID:126 | Posted:4/22/2008 10:35:51 PM | Updated:4/16/2013 9:36:37 PM |
There are two ways to add locations, schools, teams, or payors to your RefTown database:
For large numbers of locations, schools, teams, or payors , the import method can be the most efficient. To add a location, school, team, payor directly on the website, one at a time:
· (Forms can also be submitted by pressing "Enter" when in simple text entry fields) To add multiple locations, schools, teams, and/or payors by importing from an .xls file
| ||
How does an administator edit a school's or team's information? | ||
| Article ID:35 | Posted:4/25/2007 7:31:09 PM | Updated:4/16/2013 9:36:37 PM |
To edit one or more school or team:
Note: Selecting more than one school in step 2 is the most efficient way to edit multiple schools. | ||
Can more than one account share the same email address? | ||
| Article ID:48 | Posted:4/25/2007 10:46:08 PM | Updated:6/21/2010 11:10:03 PM |
Yes. Multiple accounts (Officials, School/Teams/Locations/Payors, or School/Team Contacts) can share the same email address. If the same address is used multiple times, each person will have access to the others’ information and will also have the same username and password. | ||
On the schools/teams roster, what do the Payor, Location, Home, and Visitor check boxes mean and how do I change them? | ||
| Article ID:80 | Posted:5/8/2007 3:10:04 PM | Updated:11/17/2017 2:51:26 PM |
By default, a school/team entry is a payor, a home team, a visiting team, and a location. You can, however, define which lists a given school will appear in. A school will only show up in the defined fields when entering games. In order to make the game entry more efficient, you should deselect the options that are not relevant. If you leave only "Location" selected, that entry will only be a selected item in the location field. It will not appear as a possible home/visiting team or as a payor. If you deselect all options, it will remain in the roster but will not be selectable in any of the matching fields on the game entry page (You can also "hide" a school"). To change the category of a school, you have two options: 1. To edit all of them (or just several) at once, go to "Directories" -> "Schools." Then click on "QuickLinks" (red box in the upper left area of the page). Select "Manage Categories." This will give you a long list of schools with checkboxes for the 4 different types of lists. Make your changes and click Update. 2. Alternately, to edit just a few, go to "Directories"-> "Schools/Teams." Search for the school of interest. Click its checkbox and "edit" that school to set the desired school type. Upon returning to a game entry page, the lists should now reflect the selections made. | ||
How do I enable my association for online registration? | ||
| Article ID:88 | Posted:6/5/2007 10:38:57 AM | Updated:4/16/2013 9:36:37 PM |
|
To enable online registration for your organization:
| ||
How do I manage school/team/location registration forms? | ||
| Article ID:127 | Posted:4/22/2008 11:29:47 PM | Updated:4/16/2013 9:36:37 PM |
Registration forms filled out by logged in schools automatically update their roster entries. For schools that are not logged in at the time of filling out the registration form, the information is stored in a pending registration list. To get to pending registrations, go to the schools roster and click on Manage Registrations (just above directory table). On that page, you can:
| ||
How do I merge duplicated roster entries? | ||
| Article ID:200 | Posted:10/30/2013 3:32:57 PM | Updated:12/21/2025 1:51:02 PM |
In the event you end up creating more than one roster entry for the same person or team, you can use the merge feature to blend the two entries into a single entry. This operation will move all games associated with both entries to be associated with the one combined entry. Other secondary data, such as permissions and scratches and availability will be merged. In the event of conflicting information in the two availability calendars, only one calendar will effectively be saved. To merge to duplicates, you must first location the two so that they appear on the same screen. Some duplicates can be found using the "Show Duplicates" report under the Quick Links menu for each roster type (Officials, Schools/Teams, or School/Team Contacts). You can also use the search form on each of these pages to search for a part of the name that is common to both entries. It may also be easier if you edit one of the two entries to have a name similar to the other (e.g. School ABC and School ABC 1). It is possible to merge more than two down to a single entry. There is technical no limit on how many duplicates you can select to be combined at one time but it may be easier if you only merge 2-3 to 1. Once you have the duplicate entries listed, click both entry's selection checkboxes. Then click the merge button: This will open a new page that will list each of the entries, one per column. If the type of data is not the same between the entries, you will have a choice of which data to keep in the final entry. Once you have selected the data you wish to keep, click "Merge" at the bottom of the form. If you need to locate duplicate entries, you can do so using a special report under the relevant directory within the Quick Links Menu. In the officials directory, it will be in Quick Links -> Roster Management -> Duplicate Names. | ||
Using "Plus Codes" to help officials find gym/field entrances | ||
| Article ID:299 | Posted:7/31/2022 7:41:19 PM | Updated:7/31/2022 7:50:23 PM |
Plus codes are a location identifier that can be used to mark a very specific location far more precisely than an address. You can use them to indicate a specific entrance to a facility to help officials locate where they need to go. Once added to Reftown, there will be a plus code symbol by the address of the location. It looks like this:
To add a plus to to a location (assuming you already have an address for the location.
Done! Now, when a user clicks on the plus code symbol, it will show them the location of that exact entrance...they can even navigate to that point. Repeat for other locations as necessary. | ||
Address Errors for Officials / Locations...unable to identify latitude and longitude | ||
| Article ID:334 | Posted:11/5/2025 9:18:54 PM | Updated:11/5/2025 9:19:22 PM |
When you have an official or game location where the address indicates an error and the system is unable to identify the latitude and longitude, there could be several reasons. First, double check the address, including the spelling of the street and city as well as the zip/postal code. If the error remains, you can manually enter the latitude and longitude for the location. Steps to manually add latitude and longitude information for an official / location:
Hawaii and Alaska will be outside of these ranges.
| ||
Setup school/team personnel to log into to one or more teams | ||
| Article ID:135 | Posted:5/26/2008 10:44:18 AM | Updated:9/28/2023 12:02:21 PM |
A payor/location/team contact can be configured to have access to one or more payor/location/team�with one username and one password. A payor/location/team can be configured to grant access to one or more payor/location/team contacts�each with their own username and password. For a person affiliated with a payor/location/team to have access, 3 things must be done:
To link a payor/location/team contact to a payor/location/team:
Alternative Method: To link a payor/location/team to a payor/location/team contact :
| ||
How do I merge duplicated roster entries? | ||
| Article ID:200 | Posted:10/30/2013 3:32:57 PM | Updated:12/21/2025 1:51:02 PM |
In the event you end up creating more than one roster entry for the same person or team, you can use the merge feature to blend the two entries into a single entry. This operation will move all games associated with both entries to be associated with the one combined entry. Other secondary data, such as permissions and scratches and availability will be merged. In the event of conflicting information in the two availability calendars, only one calendar will effectively be saved. To merge to duplicates, you must first location the two so that they appear on the same screen. Some duplicates can be found using the "Show Duplicates" report under the Quick Links menu for each roster type (Officials, Schools/Teams, or School/Team Contacts). You can also use the search form on each of these pages to search for a part of the name that is common to both entries. It may also be easier if you edit one of the two entries to have a name similar to the other (e.g. School ABC and School ABC 1). It is possible to merge more than two down to a single entry. There is technical no limit on how many duplicates you can select to be combined at one time but it may be easier if you only merge 2-3 to 1. Once you have the duplicate entries listed, click both entry's selection checkboxes. Then click the merge button: This will open a new page that will list each of the entries, one per column. If the type of data is not the same between the entries, you will have a choice of which data to keep in the final entry. Once you have selected the data you wish to keep, click "Merge" at the bottom of the form. If you need to locate duplicate entries, you can do so using a special report under the relevant directory within the Quick Links Menu. In the officials directory, it will be in Quick Links -> Roster Management -> Duplicate Names. | ||
Give a Payor/Team Contact Access to an entire Group of Payors/Teams at one time | ||
| Article ID:309 | Posted:9/28/2023 9:29:47 AM | Updated:9/28/2023 9:29:47 AM |
To give a payor/team contact visibility to all his/her teams at one time, you�ll need to group her teams into a �League� or �District�. Steps�. Create the District/League
Add teams to the District
Give the Contact access to the entire District/League
| ||
What does "New Season Setup..." do? | ||
| Article ID:64 | Posted:4/27/2007 12:24:35 AM | Updated:9/24/2025 9:44:39 PM |
This link is found on the "Admin" -> "Configuration" page or, in some cases, on your home page if you have older games in the system. It takes you to a page that provides several functions to prepare for a new season. Among those options are:
For most things, you can select a cut-off date to clear form the live system. All games, meetings, etc. after the specified date remain in the live system. For most organizations, the default options are what will be needed. If you have custom fields in your organization, you may wish to clear some of those (such as test scores, etc.). If you require officials to register each and every year/season, you will want to clear registration status for officials. Once you remove items from the live system, you can delete things you no longer need including teams, officials, locations. etc. | ||
How does an assignor print schedules for officials? | ||
| Article ID:58 | Posted:4/26/2007 12:01:02 AM | Updated:6/21/2010 11:23:34 PM |
You have two choices when printing schedules for officials or schools/teams:
You can also print by date. To print the schedules:
A page will open listing all schedules based on the chosen criteria. When printed, this page will place each official’s schedule on a separate page. | ||
How does an assignor print or email schedules for teams/schools? | ||
| Article ID:59 | Posted:4/26/2007 12:03:58 AM | Updated:11/14/2019 11:30:58 AM |
To print/email the schedules:
A page will open listing all schedules based on the chosen criteria. Depending on your search terms, this page can take a while to load. At this point, you can remove some schools from the list of recipients if needed. You can also add an optional message to the email that will be sent. Finally, click "Send Schedules by Email" When printed, this page will place each school�s schedule on a separate page. This function is the same function that is used to send schedule reminders as configured under the configuration pages. | ||
How do I print or export an officials or schools roster? | ||
| Article ID:56 | Posted:4/25/2007 11:52:22 PM | Updated:6/21/2010 11:22:29 PM |
The printing of rosters from RefTown is done by exporting the data to your own application (e.g. Excel) for formatting as you wish. To export a roster:
In order to protect the email addresses of those on the roster from potential junk mail, the exported information will not include email addresses unless you are an administrator. | ||
What are the different permissions groups that an official can be part of? | ||||||||||||||||||||||||||||||||||||||||||||||||||||||
| Article ID:61 | Posted:4/26/2007 11:52:26 PM | Updated:9/13/2023 2:03:50 PM | ||||||||||||||||||||||||||||||||||||||||||||||||||||
| ||||||||||||||||||||||||||||||||||||||||||||||||||||||
What information do schools/teams have access to? | ||
| Article ID:62 | Posted:4/27/2007 12:14:02 AM | Updated:6/21/2010 11:26:55 PM |
Schools/Teams have access to a very limited set of information:
| ||
How do I grant an official extra access permissions? | ||
| Article ID:95 | Posted:6/5/2007 5:19:00 PM | Updated:7/11/2023 9:48:07 AM |
There are two ways to manage the extra access permissions for officials:
Once on this page, you can add/remove officials from the various groups. If you entered through the group symbol for a specific official, you'll have direct access to remove that official from any of the groups the official is already part of. If you entered through the "Permissions" menu item, you'll have a list of groups and can manage additions and subtractions for all.
If the newly added official is already logged in, they must logout and log in again to activate any new permissions. (Switching accounts for those that multiple accounts does the same thing). Using Extra Permissions Note that any extra permissions are not activated when a user is logged in automatically by way of the "Keep Me Logged In" option. They can still use that option but will only have basic level official permissions while doing so.This will be indicated by the presence of a warning triangle by the user's name in the top right: | ||
How can I, a user with extra permissions, view the site as it is seen by others? | ||
| Article ID:163 | Posted:11/23/2009 11:40:03 PM | Updated:9/28/2016 3:57:17 PM |
All administrators, assignors, or anyone else with permissions that allow them access beyond that of a general account can choose to temporarily disable their access to those permissions in order to view the site as others see it. When you disable such permission, you will view the site as someone who doesn't have such permission until you either re-enable those permissions or you log out and log in. In order disable a set of permissions:
To re-enable a set of permissions:
| ||
What options are there in selecting recipients for emails? | ||
| Article ID:130 | Posted:5/2/2008 12:05:17 AM | Updated:6/22/2010 11:38:45 AM |
There is a large set of options for addressing the email to various groups of people affiliated with your organization.
A Preview Recipients Option is available to see who will be sent the email before it is sent if it is at all unclear how the selections will be processed. | ||
Can I define custom lists of email recipients? | ||
| Article ID:96 | Posted:6/5/2007 5:22:52 PM | Updated:9/19/2017 11:38:37 PM |
Yes. Under the same interface used to grant and manage access permissions, you can also define "custom" groups. These groups are used only for the purposes of creating a list of people you regularly send email to (to avoid having to select each name every time). You can find this option in two places:
| ||
What delivery options are there in composing the email? | ||
| Article ID:131 | Posted:5/2/2008 12:15:09 AM | Updated:6/22/2010 11:39:07 AM |
Under "More Send Options," the following options exist in selecting how an email is delivered:
| ||
What if, while composing an email, my browser crashes or I make a mistake that deletes everything? | ||
| Article ID:174 | Posted:12/7/2009 11:43:27 PM | Updated:6/22/2010 12:28:37 PM |
Normally, if you navigate away from the email composition page, your work will be lost. However, the editor on RefTown automatically saves the content of your composition every couple of minutes to a location on your computer. How much it is able to recover depends on the Browser you use. Some can save just about anything you might compose, but others are more limited. To restore a lost composition, click the "life preserver" symbol at the top right of the email editor. | ||
Sending Email to Officials, Coaches, Athletic Directors, etc. | ||
| Article ID:269 | Posted:4/21/2021 4:09:16 PM | Updated:4/21/2021 4:09:53 PM |
All users can use the built in email function to email others listed on the various rosters in your organization account. The function is accessed under the menu "Email" -> "Send Email / Text". Officials can use the email function but only in a limited capacity. By default, Officials can only email up to 3 other selected individuals or the other members of a crew on a game he/she is working. The number 3 can be customized on the configuration page. Access to the email function by officials can also be disabled. Officials do not have the option of choosing officials by all of the criteria available to administrators, but only by name or by game. School/Team contacts also have access to the email function in some cases but their access is more limited if the options to allow them to see the contact info for officials is disabled. | ||
Driving Distance Methods | ||
| Article ID:228 | Posted:6/14/2017 10:40:49 PM | Updated:7/24/2025 8:00:01 PM |
RefTown supports to modes of driving distances. The first and default method uses an approximated distanced based on latitude and longitude derived from officials and location addresses. The latitude and longitude of each official and location is stored on RefTown and an equation is used to calculate the line-of-site distance between the two points. That distance is then padded about 20% to account for the fact that the roads are rarely that direct. This number is generally good enough when identifying officials closer or farther from a given game location. This method would be insufficient in the presence of rivers, lakes, mountains or other obstacles that lead to longer driving distances despite the fact that the two locations are not that far apart or when the route might be very straight. RefTown, also supports a mode that actually queries Google Maps for the actual route between the official's location and the game's location. This provides a very accurate driving distance. This is much more complicated and resource intensive than the simple latitude/longitude calculations but it will be accurate if the addresses in the system are correct and accurate. Enabling this mode also allows for drive time estimations in addition to distance. THE FOLLOWING OPTION IS NO LONGER AVAILABLE. WE ARE WORKING ON A REPLACEMENT. Note that the first accesses after entering this key to pages that reference driving distances will be very slow as the distances are calculated. Depending on the number of officials and locations your organization has, the first accesses may be extremely slow. However, subsequent accesses will process at typical speeds. | ||
Setting up Reftown and Google Maps for Precise Driving Distances | ||
| Article ID:328 | Posted:7/24/2025 8:00:07 PM | Updated:7/25/2025 10:47:18 AM |
This is used to set up Reftown for calculating precise driving distances related to assignments. Logging Into a Google Cloud Account
Creating a Google Cloud API Key for Driving Distances After logging into the Google account as described above, execute the following steps to create your Google Maps key.
Applying the Key for Use on Reftown. After creating the API key on the Google Cloud Console, you will then need to copy the key and paste it into the Reftown configuration pages.
NOTE: It is possible that at the time of a new setup, an organization might incur a sizable expense from Google when a large number of distances need to be calculated....from all officials to a large number of location locations. | ||
Setting up Reftown and Google Maps for Embedded Maps | ||
| Article ID:329 | Posted:7/24/2025 8:32:16 PM | Updated:2/25/2026 4:59:40 PM |
This is used to set up Reftown for calculating precise driving distances related to assignments. Logging Into a Google Cloud Account
Creating a Google Cloud API Key for Embedded Maps After logging into the Google account as described above, execute the following steps to enable the API create your Google Maps key.
Applying the Key for Use on Reftown. After creating the API key on the Google Cloud Console, you will then need to copy the key and paste it into the Reftown configuration pages.
| ||
How can games be added to RefTown? | ||
| Article ID:38 | Posted:4/25/2007 8:09:46 PM | Updated:5/20/2018 7:27:19 PM |
There are three ways to add games to the system:
| ||
How does Batch Add Mode work? | ||
| Article ID:40 | Posted:4/25/2007 8:21:55 PM | Updated:6/21/2010 11:04:21 PM |
Batch Add Mode is extremely useful for entering multiple games that have one or more things in common. It uses previously entered information to pre-fill the entry form. All you need to do is change the items that are different than the previously entered game. For example, you’ll save a lot of entry time when you are entering a schedule for a school that has 10 varsity games all played at 7:30 p.m. with only the dates and visitors differing. On the first game, you'll enter all the details. If you save the game with the batch mode enabled, the entry form will reappear. Rather than being blank, it will have the first game's info filled out. Just change the date and the visitor and save. Repeat for all games in the list. A similar approach is beneficial if you're entering a sequence of games that occur at the same location in a short amount of time. In this case, you'll change the time and teams—and any other piece that remains the same. To exit the mode, uncheck the mode prior to saving the last game or click "Cancel Changes and Close Window." | ||
How do I import games into RefTown? | ||
| Article ID:41 | Posted:4/25/2007 8:24:56 PM | Updated:5/11/2021 9:57:40 AM |
| ||
How do I check the quality of the games that have been entered? | ||
| Article ID:43 | Posted:4/25/2007 8:38:32 PM | Updated:6/21/2010 11:05:45 PM |
Go to "Schedules" -> "Game Management." On that page, there are several reports than can be viewed. The available reports are under "Game Quality Checks." These checks look for critical fields (such as date, time, location, etc.) that are missing data, for dates and times that are suspicious, and for potentially duplicate entries in the system. | ||
What happens when a game is edited? | ||
| Article ID:65 | Posted:4/27/2007 12:32:04 AM | Updated:6/21/2010 11:28:06 PM |
|
When a game is edited, several things happen:
| ||
On the schools/teams roster, what do the Payor, Location, Home, and Visitor check boxes mean and how do I change them? | ||
| Article ID:80 | Posted:5/8/2007 3:10:04 PM | Updated:11/17/2017 2:51:26 PM |
By default, a school/team entry is a payor, a home team, a visiting team, and a location. You can, however, define which lists a given school will appear in. A school will only show up in the defined fields when entering games. In order to make the game entry more efficient, you should deselect the options that are not relevant. If you leave only "Location" selected, that entry will only be a selected item in the location field. It will not appear as a possible home/visiting team or as a payor. If you deselect all options, it will remain in the roster but will not be selectable in any of the matching fields on the game entry page (You can also "hide" a school"). To change the category of a school, you have two options: 1. To edit all of them (or just several) at once, go to "Directories" -> "Schools." Then click on "QuickLinks" (red box in the upper left area of the page). Select "Manage Categories." This will give you a long list of schools with checkboxes for the 4 different types of lists. Make your changes and click Update. 2. Alternately, to edit just a few, go to "Directories"-> "Schools/Teams." Search for the school of interest. Click its checkbox and "edit" that school to set the desired school type. Upon returning to a game entry page, the lists should now reflect the selections made. | ||
How do I enter games such that schools/teams can approve the entered games? | ||
| Article ID:92 | Posted:6/5/2007 4:24:01 PM | Updated:6/21/2010 11:45:13 PM |
School/Team approval of games (if enabled) is based on the Payor field. This field is only displayed to administrators and assignors. A game can only be approved or rejected by the team/school listed in the Payor field. | ||
How does and assignor notify or remind schools/teams that they have games needing a response? | ||
| Article ID:50 | Posted:4/25/2007 10:56:00 PM | Updated:6/21/2010 11:20:11 PM |
It opens with a template email at the top and a list of every school/team that has games to be approved. You can sort that list by name, by email address, or by date of the first game that needs a response by clicking on the column title. | ||
How do schools request games on RefTown? | ||
| Article ID:42 | Posted:4/25/2007 8:26:40 PM | Updated:9/17/2024 12:38:12 PM |
Go to "Schedules" -> "Game Request" (only available to schools and assignors). The interface for schools is the same as the assignor's interface (see the related article). The only difference is that the games requested by schools do not go directly to the schedule but into a requested games list where the assignor can choose to put them on the schedule or can delete the request. To enable this feature, go to:
| ||
How is the rating for a game determined? | ||
| Article ID:134 | Posted:5/20/2008 9:22:09 AM | Updated:11/6/2017 2:00:53 PM |
By enabling this feature, assigning your officials a rating, and setting up rating values for the various game attributes (level, type, league, etc), you can develop a list of officials to select from whose skill levels approximately match the games. The rating for a game can be determined in one of two ways:
These various attributes can be configured to adjust the required rating by a different value for each of the various options. For example, you might set a varsity game to have a rating of 20 points, a JV game to 10, freshman to 5, and the rest to 0. You might then assign League A to 20 points, League B to 10, and all other leagues to 0. Then, you could put a rating on the crewtypes such that 1-person crews are a 10 and 2 person crews are a 0. You could set men's games to 15 and boys games to 5. The effect of this is that for a given game, each of the values are added together to get a rating for each game. The values to be used for each attribute can be set under the configuration pages for the various lists. The maximum rating is 100�any calculated value that exceeds 100 will be changed to 100. The minimum is 0. The final rating required for a specific assignment is based on the specified or calculated game rating plus an offset for the specific duty being assigned (if entered) in combination with an allowed range above/below the game rating. Then, based on the officials' rating and the size of the allowable range above/below the game rating, you'll get a list of officials who are capable of working the assignment. This list will be used in manual assignment mode to reduce the default list of selectable officials and will be use in auto-assign mode to generate a list of officials that can be selected. | ||
How can I completely delete one or more games and all related assignments? | ||
| Article ID:139 | Posted:6/19/2008 12:51:05 AM | Updated:12/28/2022 10:05:42 AM |
To completely delete one or more games:
All of the selected games will be fully and permanently deleted. (Note, this affects only live database entries...archives are unaffected). You will NOT have to option to restore games deleted in this manner. | ||
How can I enter times in the various forms throughout RefTown? | ||
| Article ID:66 | Posted:4/27/2007 12:39:31 AM | Updated:6/21/2010 11:28:25 PM |
The format in which you can enter times is very flexible. RefTown applies basic logic to complete the time if you enter a shorthand time:
For example, all of the following are converted to the same time:
| ||
Restoring a Canceled or Postponed Game | ||
| Article ID:224 | Posted:10/16/2016 2:24:31 AM | Updated:10/16/2016 2:24:31 AM |
In restoring a canceled or postponed game, you must first locate the game. You can do so in one of may ways:
Once you have located the game you wish to restore, you can edit the game entry and deselect the checkbox for Canceled or Postponed. If postponed, you can simply change the date to the new date and, upon saving, it will be restored to active status. If canceled, it does not, however, restore any assigned officials. If you wish to restore a canceled game and the previously assigned officials, you can do so either manually or with an automated function by check the games checkbox and clicking the button: | ||
How to add games... | ||
| Article ID:39 | Posted:4/25/2007 8:15:34 PM | Updated:5/20/2018 7:28:24 PM |
To add games to the system:
After saving the game, the add-game/match form will remain open for adding another game. It will be pre-filled with the data from the just saved game/match. You can then modify those items which are not the same as the prior entry and save again without needing to re-enter much of the same info. If you do not need to enter another game, you can simply close the form....click "Close and Reload" to have the main listing show the saved information. Even if you do not click "Save and Reload" the information was already saved at the time of the Update. Tips for game entry...
| ||
Exporting Games to Excel | ||
| Article ID:237 | Posted:11/9/2018 12:29:41 PM | Updated:12/17/2023 12:04:16 PM |
To export games (matches) from RefTown to Excel (.xlsx):
For administrators/assignors, you can use this export to make modifications to game details such that you can import the changes back to the system. See the attached article on importing games for more information. | ||
Duplicating / Replicating a Set of Games | ||
| Article ID:267 | Posted:4/14/2021 10:30:08 PM | Updated:4/14/2021 10:35:18 PM |
If it is necessary to duplicate a previous schedule to just changing the date and/or time:
WARNING: If you do not remove the GameID, the following import will not add a new game but will modify the game identified by that GameID to match what you now have in your spreadsheet.
| ||
Syncing Games from External System (OSAA only) | ||
| Article ID:313 | Posted:5/10/2024 9:41:25 AM | Updated:8/1/2025 9:07:18 PM |
These instructions are for schools in Oregon that use OSAA.org to manage their games.
Once you have all the pieces entered, click the save button:
If you check the "Save" check boxes, every mapping from OSAA.org to Reftown you enter will be remembered to be reused in the future. The mappings you save are only saved for you, not anyone else, and they can be deleted or updated. After adding a few games, the only things you might need to select will be the sub-location (gym #) since that information is not present on OSAA.org. For now, this is only enabled for games where you are listed as the Home Team on OSAA.org. You'll need to enter tournaments or other Neutral Site games the old ways. | ||
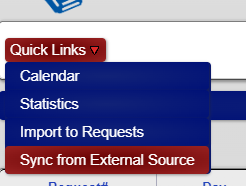

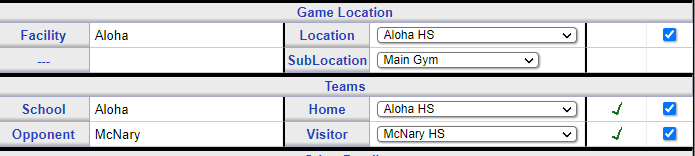

What reports are available regarding officials availability? | ||
| Article ID:52 | Posted:4/25/2007 11:21:21 PM | Updated:6/21/2010 11:21:06 PM |
Availability information is entered through "Schedules" -> "Availability" You can enter availability in one of two ways:
If both are entered, the specific date information is used. To enter availability information by day of the week:
To enter availability information for specific dates:
There are a three buttons at the top of the form that may assist you in filling out your availability. You can use them to designate all days/dates as available, not available, or clear the times. Use this if most of your availability is the same and then fill in the boxes that are different. | ||
How do you change the response of an official to an assignment? | ||
| Article ID:76 | Posted:5/8/2007 2:32:12 PM | Updated:4/16/2013 9:36:37 PM |
Only assignors can change the response to an assignment once it is submitted. To do so:
| ||
How is driving distance calculated? | ||
| Article ID:133 | Posted:5/20/2008 9:16:16 AM | Updated:11/2/2018 12:12:25 AM |
Driving distance is an approximation based on the address or zip code of the game site and the address or zip code of the official. RefTown converts each person/location's address to latitude and longitude if that can be determined and, if not, uses a database of the latitude and longitude of the center of each zip code to calculate approximate driving distance. The calculation assumes a straight route plus an extra 20% to account for the fact that the roads will not actually be a straight line. The game site address and zip code is taken directly from the Schools/Teams roster for the site listed as the location of the game. If no address or zip code is entered for the location, the driving distance will be assumed to be 0�everyone will be eligible to drive to that location no matter the actual distance. By default, the official's zip code is taken from the official's roster entry. Optionally, each official can specify two alternative zip codes under their "Account" profile. An official can specify two zip codes and a time if they generally transition between the two. Additionally, an official can specify zip codes on their availability calendar to apply to the day/date and window of time being entered on that calendar. This can be used to influence the assignment of games to be near two different places depending on the time of day and on various days. If no zip code is listed for an official, the driving distance will be assumed to be the official will be considered eligible to drive to any location. An official can update their effective zip codes by:
| ||
How do I manage ratings for officials? | ||
| Article ID:188 | Posted:8/16/2011 3:10:54 PM | Updated:8/3/2024 3:05:31 PM |
There are two ways to edit the ratings for officials....individualy or for you entire group. To edit a single official's rating
To edit your entire group of officials
Ratings can also be managed by exporting the roster to Excel, updating the ratings column, then importing the modified spreadsheet back into Reftown. | ||
Can on official see assignments before they are published? | ||
| Article ID:225 | Posted:10/16/2016 2:31:04 AM | Updated:10/16/2016 2:31:04 AM |
By default, game assignments are not visible in any form until they are published. However, an optional feature can allow officials to see that they have "something" on a given date without any details aside form the date and the general time of day. To enable this feature...
| ||
Reading Availability Information on the Assignments Screen | ||
| Article ID:315 | Posted:8/22/2024 12:29:23 AM | Updated:8/1/2025 9:07:56 PM |
Given a game that starts at 4:00 PM, you might see the following info on a when assigning officials:
Looking at the line highlighted in RED:
Looking at the line highlighted in yellow:
Looking at the line highlighted in blue:
Any availability space that is blank indicates that the officials doesn't have a time limit close enough to that game to matter. They may have something for that date, but it is more than an hour to spare. | ||
.png)
Limiting Officials from Seeing the Same Teams | ||
| Article ID:317 | Posted:8/22/2024 12:39:52 AM | Updated:8/1/2025 9:07:56 PM |
There are configuration options available where you can limit how often an official will see the same team. There are 4 types of limits:
In general, the "same team" is determined by both the team name and the game attributes (sport, league, type, and level). To set the numbers for the maximums/minimums for same teams/locations, go to Admin -> Configuration, ASSIGNMENTS -> Limits. Look for the section called "Team Repeat Limits". You might wish to set these limits lower as you start assigning and move them up as you work through a season. Any of the game attributes can be disabled when considering what defines a team. To ignore given game attributes, go to Admin -> Configuration, GAMES -> Check Options. Look for the Same Team Check Exceptions. The numbers will appear in boxes on the assignment screen and can be overridden while making assignments.
The above values will keep an official from seeing the same team more than 2 times and never closer than 14 days apart and will prevent the officials from seeing the same two teams play each other more than 1 time. Note, these limits apply to all games. If you want them to apply to one set (e.g., HS) but not another (e.g. MS), you will either need to change the configuration as you assign different sets of games OR override the values when making assignments. Note that when you make overrides when making assignments, those overrides carry through all games that you had selected when starting to make the assignments. | ||
.png)
Using Preset/Predefined Crews | ||
| Article ID:319 | Posted:8/27/2024 11:14:52 AM | Updated:8/27/2024 11:14:52 AM |
This function can be used to select a group of officials you wish to assign as a group. This is most often used by Football groups but may be useful in other sports or situations such as Mentor/Mentee pairs. To create crews: The first step is to create the crew structure: a name, a type of crew
The second step is to add members to the crew
Repeat for each crew. To use crews:
Other: On the Predefined Crews page, there are a number of reports you can run to find officials not in a crew or a list of officials and what crew they are in. | ||
Setting up Reftown and Google Maps for Embedded Maps | ||
| Article ID:329 | Posted:7/24/2025 8:32:16 PM | Updated:2/25/2026 4:59:40 PM |
This is used to set up Reftown for calculating precise driving distances related to assignments. Logging Into a Google Cloud Account
Creating a Google Cloud API Key for Embedded Maps After logging into the Google account as described above, execute the following steps to enable the API create your Google Maps key.
Applying the Key for Use on Reftown. After creating the API key on the Google Cloud Console, you will then need to copy the key and paste it into the Reftown configuration pages.
| ||
How do I assign officials to Games? | ||
| Article ID:82 | Posted:6/5/2007 10:08:21 AM | Updated:1/5/2018 11:41:03 AM |
There are a couple of ways to start:
Once you have the list of games you want to assign:
TIP: It is much faster to select several boxes and assign a group of games at a time so that you can avoid reloading the games page between each one. | ||
How does an assignor publish assignments? | ||
| Article ID:30 | Posted:4/25/2007 6:44:15 PM | Updated:4/16/2013 9:36:37 PM |
There are two ways to publish new or changed assignments: 1. When there are assignments needing to be published, there will be a button appearing at the top of most games pages that permits the publication of all games. 2. Alternatively, specific games can be published by selecting the desired games and clicking | ||
What happens when assignments are published? | ||
| Article ID:63 | Posted:4/27/2007 12:19:38 AM | Updated:6/21/2010 11:27:13 PM |
On publishing an assignment, a few things occur:
| ||
Why do some officials not appear in the list of officials to assign? | ||
| Article ID:31 | Posted:4/25/2007 7:03:23 PM | Updated:6/21/2010 10:55:51 PM |
There are several possible reasons an official does not appear in the default list of officials to choose from:
All of the above reasons can be overridden by using the "Include Officials" options. When editing multiple assignments, the settings you select on one game will carry forward to the following game. | ||
How do I assign officials that do not appear in the list of assignable officials? | ||||||||||||||||
| Article ID:32 | Posted:4/25/2007 7:11:02 PM | Updated:6/21/2010 10:56:38 PM | ||||||||||||||
To make officials who are, by default, not assignable, check one or more of the boxes in the "Include Officials" options. The available boxes are:
Note: When these overrides are used, those officials who would have been excluded from the list of assignable officials will appear on the list along with the basic details of why they were not originally listed. | ||||||||||||||||
Who receives an email confirmation of accepted/declined assignments? | ||
| Article ID:93 | Posted:6/5/2007 4:39:18 PM | Updated:11/3/2010 12:45:30 AM |
When a set of games is assigned, an email confirmation is generated. That email is sent to the following:
For the purposes of these responses, the assignors who will receive the email are defined in 3 ways as defined under the association's configuration:
NOTE: An association can, to reduce unnecessary email, choose to disable emails in two cases:
| ||
Can an official change their response to an assignment after it is submitted? | ||
| Article ID:89 | Posted:6/5/2007 4:03:33 PM | Updated:6/21/2010 11:36:37 PM |
If an official wants to change a response from decline to accept, that official should contact the appropriate assignor. The assignors have the ability to change the response. If an official wants to change a response from accept to decline, the official will have one of two options, depending on the settings that official’s organization has chosen. If the organization has enabled the turnback option and the deadline for a turnback has not passed (another option that is usually set to 2 or 3 days before the game), the official should see a "Turnback" link directly under the game number on that official’s schedule. If no turnback link appears, the feature is not enabled and the official is not permitted to change previous responses through RefTown once they are submitted. When the turnback feature is either not enabled or the turnback deadline has passed, the official should contact the assignor so the assignor can change the response. | ||
Why does an officials prior response get cleared when part of the crew is changed? | ||
| Article ID:72 | Posted:5/8/2007 1:57:30 PM | Updated:6/21/2010 11:32:13 PM |
Be default, RefTown is set to require a new response from every crew member when part of the crew is changed. This ensures that all members of the crew have the most current information. This function can be disabled to require a new response only from officials directly affected by the change (i.e., the official added or removed). | ||
How do I set RefTown to not clear a official's prior response when there is a crew change? | ||
| Article ID:73 | Posted:5/8/2007 2:03:14 PM | Updated:6/21/2010 11:32:35 PM |
Go to:
and uncheck "Require Official Response on Crew Change." "Require Official Response on Crew Change ". | ||
Can officals "scratch" certain schools, levels, leagues, etc.? | ||
| Article ID:70 | Posted:4/27/2007 1:01:03 AM | Updated:10/5/2016 12:41:10 PM |
Yes. An official can enter a restriction into the system that they should not work for particular school, team, level, league, etc. or any combination of these items. Official can scratch locations or even locations by zipcode. To do so:
Assignors can also fill out scratches on behalf of officials. Assignors can choose whether or not to allow officials to see those scratches. Some organizations may not allow officials to manage this data....only permitting assignors to enter scratch data. | ||
How does an assignor notify or remind officials that they have assignments needing a response? | ||
| Article ID:49 | Posted:4/25/2007 10:53:45 PM | Updated:4/8/2025 7:40:53 PM |
Notices are automatically sent when assignments are published. Notices about changes to games are automatically sent when the change involves a game within the time frame configured by the association (defaults to 14 days). To send additional notices:
It opens with a template email at the top and a list of every official who has a game or games to accept or acknowledge. You can sort that list by name, by email address, or by date of the first game that needs a response by clicking on the column title. You can alter or add to the email template that is started, except for the very first part, which says:
Once you have the email content to your liking, click "Send Notice." This will send a customized email to each official who has games needing a response. It will tell officials how many they have and, unless you alter it, prompt them to log in and respond to them. | ||
How does an assignor manage officials who do not have email? | ||
| Article ID:60 | Posted:4/26/2007 11:25:50 PM | Updated:6/21/2010 11:24:57 PM |
The assignor can mark off the games on behalf of the official who does not email. To do so, the assignor will need to get to the official’s games. There are two ways to do so:
Through either method, you'll be taken to the games page as it would look for the selected official. Mark the official’s games as accepted/declined/etc., in the same manner as accepting your own games. | ||
Viewing how many assignments an official already has while making new assignments | ||
| Article ID:231 | Posted:11/2/2017 10:35:21 PM | Updated:8/1/2025 9:07:18 PM |
Reftown's assignment function provides an assignor information while assigning about how many games an official has already been assigned and how many times each official has been previously assigned to other games with the team currently being assigned. This information is off by default but can be enabled by clicking a checkbox on the assignment screen that will reveal the information...
Each assignor change choose the opposite default (to show the information) under his/her account profile. When the information is enabled, the assignor will be given the following:
In this example, the total number of assignments is shown first, followed by the team specific info. Virginia Duffy has a total of 8 games and saw the home team of this game 1 time with the most recent date (relative to the current game date) being 12/8. Similarly for David Reed but on 12/1. Further down the list, Richard Howard shows that he as see the current game�s visitor one time on 12/6. | ||


Limiting the number of times an official will see a specific team | ||
| Article ID:232 | Posted:11/2/2017 10:40:49 PM | Updated:8/1/2025 9:11:34 PM |
The assignment function can be programmed to exclude officials from being eligible for assignment to the same team over a certain number of times. There are four options for this function. Maximum per location, Maximum per team, Maximum for both teams, and Minimum Days since last seen.
All of these numbers can be programmed to preferred values but can be overridden on the assignment screen. Early in the season, it might be useful to set the Maximum games per team numbers fairly low but increase them as the season progresses. The default settings can be made under Admin -> Configuration, ASSIGNMENTS, Assignment Options. The place to override the numbers while assigning is in this section:
| ||
Linking games for assignment to same crew | ||
| Article ID:233 | Posted:11/2/2017 11:46:11 PM | Updated:6/17/2025 2:09:05 PM |
Games in Reftown can be linked together so they will be treated as one assignment. Such a link is valid if the games are on the same date and at the same location (including gym/court/field). When games are linked, the times of all such games are considered when evaluating officials' availability. It is acceptable to link large number of games together in one action. The system will automatically split them up based on date/location. Games that occur after midnight up to 2 AM will be considered as if they were on the previous date if they are linked to games after 6pm on that previous date. This is to allow linking of late night games in areas that play such schedules. To link a set of games, click the checkboxes for all of the games to be linked. Then click To split a set of games that were previously linked, click the checkbox(es) of the game to be split out and click When assigning a set of linked games, the assignor will have the option of rotating the officials between positions for each game in the link set. The rotation can be in either direction, up or down as needed. There is an option with the self-assign function that controls whether the linking is enforced when an official is self-assigning. See Admin -> Configuration, #8/ASSIGNMENTS, Self-Assignment. Check | ||
How to read the team/location history information while assigning | ||
| Article ID:285 | Posted:11/5/2021 6:40:49 PM | Updated:8/1/2025 9:15:29 PM |
If you have enabled the team history information for assigning, either by default or on demand, you will presented with a lot of information. In order to not take up a lot of space, the information is compacted into a fairly dense format. This page describes how to read the information.
The team history information considers the game level and game type when deciding to count the number of times a person has seen a particular team. For example, with Boys JV will not count against Boys V, Girls V will not count the same as Boys V, etc. The location history doesn't consider anything about the game aside from its location. In addition to the counts provided, the date of the most recent and/or next assignment relative to the current game will be shown so you can decide if it has been enough time since the official has seen that team.
These items can be enabled while assigning by clearing the "Location History" and "Team History" boxes or can be enabled by default under your profile settings. | ||
How to read the availability information details | ||
| Article ID:331 | Posted:8/14/2025 9:45:17 AM | Updated:8/14/2025 9:45:17 AM |
When making assignments, you are provided a variety of information about an officials availability. First, it is assumed that officials enter availability times based on the first game start time that they can accomodate. When you see a number like -32 or + 10, that is giving you an indication of how tight that officials availability is to making it to the game. The more positive the number, the more margin the official has with making it on-time. The more negative the number, the more likely the official will be unable to make it on time. The calculation is : GameTime - AvailabilityTime - DrivingTime Note the example below with a GAME TIME of 5:00 PM.
| ||
.png)
How does automatic assigning work? | ||
| Article ID:132 | Posted:5/20/2008 8:48:16 AM | Updated:4/16/2013 9:36:37 PM |
To activate the auto-assignment function, select the game(s) you want to
assign and click The auto-assignment feature (prior to actually making any assignment) allows you to fine tune the selection parameters, takes each game you've selected, compiles a list of eligible officials, applies a weighting factor to each eligible official, and then randomly selects an official to fill each open assignment. It will report whether it was able find an official for all selected games and will provide a list of its selections for your review prior to saving the officials to the database. You will have the opportunity to either back up and revise the selection parameters or confirm the selections given. In compiling a list of eligible officials, several factors are considered—much as if they are manually assigned. For each and every game, the following factors determine if the official is eligible:
Once the list of eligible officials has been calculated for a game, that list is then, optionally, weighted to prefer some officials over others based on their rating or their driving distance.
You will then be presented with a detailed list of the selections proposed by the system and will be given a chance to back up and re-do the selections or confirm the selections. The selections will be saved in an "Unpublished" state. You will still have the opportunity to make modifications if there are a few things you'd like to adjust. Positions assigned by the auto-assignor will be marked as such when an assignor views a single game's details (by clicking on the game number where ever it appears). IMPORTANT NOTES:
| ||
How does the self-assignment feature work? | ||
| Article ID:26 | Posted:4/25/2007 6:34:45 PM | Updated:7/15/2024 11:30:39 AM |
The self-assignment/assignment request feature makes an assignment open for any official to claim/request. Here is how it works:
When a game is in "claim", the official is placed in the slot when making the claim. When a game is "request" mode, the official's request is (optionally) emailed to the assignor so the assignor can make the final decision. If the official later cannot do the game, the assignor reassigns the position to another official or removes the official from the duty. Upon removing the official from the duty, the position will reappear on the open games list. The 5 modes (and the symbols shown on games in that mode):
Note: if you do not use Ratings, only the claim/request by all options will appear to you. Symbols/Codes:
Mode Cx will operate the same as before if your organization uses the Claim mode. Mode Rx will operate the same as before if your organization was using the Request mode. Other non-rating requirements are applied to all self-assignment games the same as before. It will be possible, depending on your ratings settings for one duty to be Claimable by and official while another duty (on the same game) could be Requestable. | ||
How does an assignor make a game available for self-assignment or self-request or remove a game from the these lists? | ||
| Article ID:27 | Posted:4/25/2007 6:36:27 PM | Updated:4/16/2013 9:36:37 PM |
To add a game to the self-assignment or requestable list, select the desired game by clicking the checkbox by the game then click To remove a game to the self-assignment or requestable list, select the desired game by clicking the checkbox by the game then click Any official already on the game will remain on the game. | ||
Can an official change their response to an assignment after it is submitted? | ||
| Article ID:89 | Posted:6/5/2007 4:03:33 PM | Updated:6/21/2010 11:36:37 PM |
If an official wants to change a response from decline to accept, that official should contact the appropriate assignor. The assignors have the ability to change the response. If an official wants to change a response from accept to decline, the official will have one of two options, depending on the settings that official’s organization has chosen. If the organization has enabled the turnback option and the deadline for a turnback has not passed (another option that is usually set to 2 or 3 days before the game), the official should see a "Turnback" link directly under the game number on that official’s schedule. If no turnback link appears, the feature is not enabled and the official is not permitted to change previous responses through RefTown once they are submitted. When the turnback feature is either not enabled or the turnback deadline has passed, the official should contact the assignor so the assignor can change the response. | ||
Focused Assigning Mode (BETA) | ||
| Article ID:330 | Posted:8/1/2025 8:34:09 PM | Updated:8/1/2025 9:07:56 PM |
Focused Assigning Mode is a way to select one official and assign that official to multiple compatible games quickly. This function is built on top of the self-assign functionality. If you're familiar with that, this will be familiar. First, you must choose the official and, optionally, the types of games you wish to consider. You might wish to only look at games of a certain level, games with specific duties that are vacant, games in a certain area or distance from the official. All those parameters can be set in the game search form as you may otherwise do. In the game search form, you will find a new option along the right side called "Focused Assign.". If you choose just one official and this option, that will put you into the Focused Assigning Mode. If you are looking at the schedule for just one official in whatever way you reached the schedule, you'll have a new button in the page header that will allow you to jump in/out of the new Focused Assigning Mode
Once in the new "Focused Assigning Mode",
Your game header will now look like this:
From this header (or from within the search form), you can tell the system to ignore 3 of the criteria used to create the list of games:
In the list of potential games, you will see the referee assignment icon by each open spot, even those you may not be looking for.
Click an icon to put the official in that spot. If there are no issues, you'll get a confirmation that the official was added to that spot. You can click "Close an Reload" on the confirmation window. Once you do that, the list of potential games may be reduced. Unless you've selected the option to ignore potential conflicts, all games at other locations will now be hidden. Games at the same location as you just assigned will remain in the list. If there are issues, the confirmation window will alert you to the potential issue and will let you make the final determination. It will always alert you to situation where you are assigning the official to a 2nd game for the day. You will need to look at the times of the new game vs the existing game to determine if the separation is possible. If you put the official into a spot either by mistake or where you've changed your mind and that assignment is not yet published, a similar button will appear that will remove the official from that spot.... At the end of selecting the games for that official, you will still need to publish the assignments on the affected games. This is done by checking all the boxes with new assignments (or even all games on the page) and clicking the publish button. Note, this will publish ALL assignment changes on the selected games, even for other officials if there are any. | ||


How to Create an Invoice | ||
| Article ID:155 | Posted:6/10/2009 12:48:27 AM | Updated:6/15/2022 2:47:30 PM |
Assuming the invoice functions are enabled under the configuration options:
| ||
Creating custom invoice items | ||
| Article ID:156 | Posted:6/10/2009 1:00:05 AM | Updated:10/31/2017 9:26:29 AM |
Most invoice items are derived from games and game assignments. However, you may occasionally need to include items on the invoice that are not tied to a specific game. RefTown supports this in three ways:
Entering them is largely the same except for how you get to the entry form. To add Custom Items for Individual Invoices:
To add Custom Items for Multiple Invoices with the same category & amount:
To add Custom Items for Multiple Invoices by Excel Import:
Notes: For official invoices:
For schools/teams invoices:
| ||
Adding/Updating game fees | ||
| Article ID:157 | Posted:6/10/2009 1:12:18 AM | Updated:6/22/2010 11:43:18 AM |
There are two basic approaches you can choose from to enter game fees (for either officials or schools/teams):
With approach #1, the program analyzes the games being invoiced and will search the database for matching game fees. If no match is found, the system will ask you for the amount and will remember that amount for any future games with the same parameters. You can also pre-enter your game fees (or update existing game fees) under "Pay" -> "Officials Fees" or "Pay" -> "School/Team Fees."
Note that ALL fields except "duty," if enabled, must be filled in. When you leave the duty field blank, that fee entry will match any duty not otherwise specified in the fee table. This can be useful and will greatly simplify your game fee table when you have most of your crew members paid the same but have an occasion to specify a different amount for one or more members of some of your crews, such as a crew chief. Normally, game fees are not permitted to be "$0.00." However, this is a configuration override that will allow "$0.00" fees to be entered—use with caution. | ||
Collecting payments from officials through PayPal | ||
| Article ID:190 | Posted:9/13/2011 1:28:19 AM | Updated:6/6/2018 5:27:26 PM |
You can collect payments from officials through PayPal by generating invoices with a negative balance and supplying the PayPal email address that is connected to the account that will receive the money. After creating a negative balance invoice for one or more of your officials...perhaps for dues, banquets, equipment purchase, etc. usually using the "Custom Invoice Item" feature, you simply edit the batch properties to supply an email address associated with the PayPal account that will recieve the money. Officials can pay with an eCheck, their paypal balance, or a credit card.The official doesn't even need a PayPal account if the recipeint's account is a PayPal verified account RefTown provides this feature for no additional cost. However, PayPal will charge transaction fees for all such transactions. You can designate whether their fees will be added onto the invoice amount paid by the sender (official) or deducted from the amount received by the designated account. Enabling Guest Checkout for PayPalGuest checkout for PayPal allows your officials to pay via PayPal without signing in to a PayPal account. Guest payments are available for Business or Premier PayPal accounts. To enable guest checkout in PayPal:
| ||
Transferring Data from RefTown to Quickbooks | ||
| Article ID:198 | Posted:1/10/2013 5:22:43 PM | Updated:5/3/2021 5:29:28 PM |
First, your roster may need to be cleaned up a bit...any one who has entered a "Business Name") should be verified....some officials mistakenly put their place of employment there when it is intended to be used when they officiate as a corporation (which is not common). One Time Setup: RefTown needs to know the name of the account in QuickBooks that is used to track the amounts due to the officials (vendors). 1. Admin -> Configuration - Finances, OFFICIALS FINANCES, Advanced Invoice Options 2. Under QuickBooks Options, enter the name of the Accounts Payable account from QuickBooks. If you haven't changed it to something else in QuickBooks, it should already be set as it needs to be. Steps to import:
Repeat steps 1 & 2 as needed whenever you have a change in the roster (new names, changed names, new SSN's etc.) The roster export/import is based on the official's name. What this means is that you can't have two officials with the same name. If you have such a case, you'll want to make sure to use middle initials or something to distinguish between the two. This is a limitation imposed by QuickBooks using the names for importing. Repeating 1 & 2 should not create duplicates as long as the names remain the same. If a person changes from "James" to "Jim", the 2nd roster import will create a new vendor. In QuickBooks, you'll want to merge the two back into one. To do so, in QuickBooks, edit the obsolete name to have the new name. QuickBooks will then recognize that the two are the same and will ask if you want to merge them. Repeat steps 3 & 4 as many times as necessary, once per batch that you wish to transfer. If you try to reimport the same batch, it will give a bunch of error message about duplicate bill numbers. It is using the invoice # from RefTown to uniquely identify each invoice so you shouldn't be able to create duplicate payments for the same invoice. Once you do the invoice batch export/import, I strongly recommend that you publish the RefTown invoice batch and leave it alone. Any corrections should be done in a new batch. If you don't do that, you'll need to make manual adjustments to what you had imported into QuickBooks. Once everything is imported into QuickBooks, you can "Pay Bills" (Vendors -> Pay Bills) to start your check writing process. See QuickBooks documentation for more info. | ||
Using Custom Invoice Item Categories | ||
| Article ID:204 | Posted:1/8/2014 8:15:30 PM | Updated:8/14/2022 1:26:27 PM |
RefTown allows each non-game line item on an invoice to be categorized into any number of organization definable categories.Using such categories can allow an organization greater flexibility with managing finances. They can also be used to control what items are counted towards an official's 1099 income. Categories are not needed for game line items on invoices....they are automatically included in a "game" category. To create a category...
When adding a a custom invoice items, choose one of available categories. Custom invoice items without a specified category will automatically be included in a miscellaneous category. When you are looking at a list of invoices for officials or schools/teams, you can quickly add a custom item for each of the listed invoices. To do so, click the checkboxes for all of those you wish to add an invoice item to. Then, click AUTO INVOICING Invoice categories can be configured to be auto-invoiced on official or school/team invoices. When enabled, an official/school/team, when otherwise invoiced, will automatically have a custom line item added for the category if that official/school/team has not yet reached the limits for that category.
Example 1: You've configured a category called "Dues" to auto-invoice officials 1 time for negative $50. You create invoices for games covering week 1 of your season. Any official working in those two weeks would get a charge of $50 added to his/her invoice. Next, you create invoices for week 2 of your season. In that second week, 30 of the officials were previously invoiced in week 1. Those officials will not get a new charge for dues. However, there are 10 additional officials that had not worked in week 1. Those 10 officials will get a deduction of $50.
| ||
Transferring Invoice Information from the archives or other sources to be used for 1099 generation | ||
| Article ID:207 | Posted:1/8/2014 11:55:12 PM | Updated:1/8/2014 11:55:12 PM |
If some of your financial data is either in a RefTown archive or is in some other form, you can bring it into RefTown to be included in the official's 1099. If it is in the archives, you will first need to transistion to viewing the archives to start (Other -> Site Archives) Once in the appropriate archive...
POTENTIAL PROBLEMS:
| ||
Using the Paysheet System | ||
| Article ID:216 | Posted:10/13/2016 3:38:11 AM | Updated:4/26/2018 9:37:21 AM |
Once enabled, you�ll see some new icons on the game schedule.
The paysheet page will show the game details followed by the officials assigned along with their details as set on the paysheet configuration page. On the paysheet page will be several buttons at the top of the page that will lead to various export options and to a �printable� version of the page�a much cleaner view without the menus, buttons, and most of the links that appear on the regular view of the page. If the paysheet includes more than one game, there will be a summary section at the bottom of the listings that summarizes the total amounts to be paid to each official from each payor represented on the paysheet page. When a paysheet page with multiple games is printed, each game will appear on a new page and the summary section for each payor will be on a new page. | ||
Invoice Reconciliation and Verification Functions | ||
| Article ID:219 | Posted:10/16/2016 12:05:22 AM | Updated:10/16/2016 12:05:22 AM |
If you use both the official invoice function and the school/team invoice function, you can make use of two features that will aid you in verifying that you have the system configured correctly, have your game fees entered correctly, and that both sides are in general agreement with how much money is being charged/paid. Fee Comparisons Under the Pay Menu, click on �Fee Comparison�. This will be available and useful if the same terms (aside from Duty) are used to calculate invoice amounts for both officials and schools/teams. This page will list all currently entered fee combinations in either fee table and compare them with the opposite table.
Invoice Reconciliation Under the Pay Menu, click on "Invoices Reconciliation". This page will compare, on a game-by-game basis, the total amount of money charged to a school/team with the total amount of money paid to officials. It compares only the base game fee as well as the travel fee. This can be a great way to ensure all of your financial transactions match. This report can be filtered based on various game details. | ||
Tracking Payment Status of Invoices | ||
| Article ID:255 | Posted:1/3/2021 11:37:29 PM | Updated:6/15/2022 2:43:47 PM |
There are a few options for manually tracking invoice payment status. One option is very simple and meant to track paid or not paid, the others are a little bit more involved and allow you to enter check numbers and more. Note, this is NOT used when using our Direct Deposit or other automated payment function. This is only meant to be used to track payments made outside of Reftown. The simple methods use a payment type of "Other" and the current date for the payment date. The detailed method allows you to choose a payment method, payment date, and a payment #. First, locate the invoices of interest (not, not all methods are available to school/team administrators):
Simple Method from a Listing of Invoices
Simple Method from within a Single Invoice
Detailed Method from a Listing of Invoices
Detailed Method from a Listing of Invoices
| ||
Entering Partial Payments for School/Team Invoices | ||
| Article ID:257 | Posted:1/3/2021 11:50:18 PM | Updated:1/3/2021 11:50:18 PM |
You can now record partial payments to be applied to school/team invoices. To do so,
Any amount entered here will be deduced from the remaining balance due only. It will not change the overall invoice totals. They will remain unchanged in order to reflect the correct amounts billed regardless of whether the invoice has been paid or not paid. You can enter multiple partial payments. | ||
Overriding Game Fees (for officials or payors) | ||
| Article ID:287 | Posted:11/10/2021 9:55:02 PM | Updated:11/10/2021 9:55:02 PM |
Occasionally, it may be necessary to charge/pay an amount different than the norm for a particular game in a way that wouldn't be worth trying reconfigure the system to handle. The system allows you to manage this in two possible ways.
To specify an override on a game, click the checkbox for the game, then click In the window that opens, you'll generally have 3 sections:
In the sections to override the fees, you'll be provided boxes to individually override any of the elements related to the fees. Leave a box blank unless you want to force it to be something different than normally calculated. For all items, you can specify either
Any amounts entered will be apply the next time the invoice is generated. Changes to these override do NOT change existing invoices. If you need to make a change to an override after making the invoice, you'll need to do one of a few things. At a minimum, you'll want to refresh or regenerate the invoice(s) affected. If those invoices are published but not paid and you want to update the existing invoice, you need to unpublish the batch first. If the invoice is paid, you just need to generate a new invoice. The new invoice will account for the amount previously plaid when providing the new invoice. | ||
How can I completely delete one or more batches or invoices? | ||
| Article ID:305 | Posted:12/28/2022 9:57:26 AM | Updated:12/28/2022 10:03:21 AM |
To completely delete one or more batches, even if marked paid or published:
All of the selected batches and invoices fully and permanently deleted from the live database. (If they are also in an archive, the archive will be unchanged). USE CAREFULLY. | ||
PayPal / Venmo Payouts Overview | ||
| Article ID:261 | Posted:1/5/2021 12:35:57 AM | Updated:8/12/2021 12:25:31 AM |
RefTown integrates with PayPal's Payouts service to offer a fast and inexpensive option for paying officials to either PayPal accounts or Venmo accounts. This service uses 95% of the same functionality as our other financial services that have been available for a long time. The calculations of how much to pay, who to pay it to, and the documentation of what the payment is for have been around since the mid 2000's (with several enhancements along the way). New is the system used to transfer the money. Requirements:
Benefits:
Payments made with a credit card or payment card and certain other types of payments, including third-party network transactions, must be reported on Form 1099-K by the payment settlement entity under section 6050W and are not subject to reporting on Form 1099-NEC. See the separate Instructions for Form 1099-K.
Other Notes:
| ||
Electronic Payments / PayPal-Venmo | ||
| Article ID:243 | Posted:12/12/2020 4:39:07 PM | Updated:8/1/2025 9:07:18 PM |
|
RefTown, in combination with PayPal, offers an optional payment service that is integrated with our financial invoicing features. Once an invoice is created, it is only a couple additional steps to make the payments directly to your officials PayPal or Venmo accounts.
Officials choose their preferred option (PayPal or Venmo by Email or Phone number) under their account profile. Once officials have entered their info, you can make payments. The steps to make PayPal or Venmo payments are:
You will now have a list of invoices that have a balance needing to be paid. This will list all selected invoices whether the official has entered their PayPal/Venmo preferences or not. Each line item (one per invoice) will indicate whether account information exists for that official.
This listing will also provide a total for the cost of the batch (not including any fees for transactions to bad account numbers).
At this point the the instructions will be sent to PayPal and the funds will be moved from your PayPal account to the officials' PayPal or Venmo account.
At no time will your organization's money ever be in an account operated by RefTown...all funds will be transferred directly from your account to PayPal, and then to your officials' accounts.
All fees incurred as a result of submitting a batch will automatically be charged to the organization as an additional payment to in PayPal.
The overall cost per transaction can be cheaper than printing and mailing checks and is far more efficient.
| ||


PayPal-Venmo Payouts Setup (part 1) | ||
| Article ID:245 | Posted:12/12/2020 5:09:30 PM | Updated:12/20/2020 2:22:55 PM |
RefTown integrates with a PayPal service called Payouts. It allows immediate payments to PayPal or Venmo accounts through an official's email address or phone number. When making a payment, you do not need to know and do not care about which type of account it is going to...that all happens at PayPal / Venmo (both are owned by PayPal). For more info on payouts, see https://www.paypal.com/us/smarthelp/article/what-is-the-payouts-api-and-how-do-i-enable-it-on-my-account-ts2075 There are several steps needed to set up a PayPal account to be used for PayPal Payouts. To send payouts, you'll need:
Detailed Steps:
After getting approval from PayPal, you need to configure PayPal to allow access from RefTown.
| ||
PayPal-Venmo Payouts Setup (part 2) | ||
| Article ID:249 | Posted:12/12/2020 5:21:54 PM | Updated:8/1/2025 9:07:18 PM |
This page includes the instructions on configuring your PayPal account to communicate with RefTown. If you do not yet have an approval for using Payouts from PayPal you cannot access the items mentioned in these instructions. Make sure you have applied for PayPal Payouts and have received the approval before proceeding with these instructions. To configure PayPal to allow it to work with RefTown, complete the following steps:
| ||


Getting Paid by PayPal / Venmo as an Official | ||
| Article ID:277 | Posted:8/26/2021 3:00:41 PM | Updated:10/13/2021 11:57:45 PM |
Assignors can see this signup status for all officials on the relevant games. When a payment is made, RefTown will send you an email with the details of the payment...the game(s), the amounts, etc. Once you receive the money in your PayPal or Venmo account, you can spend in from that account using a variety of options including debit cards issued by PayPal or Venmo or you can have the money moved to your bank account whenever you like. To sign up for PayPal or Venmo, you must first have your PayPal or Venmo ID (email address or phone number) listed as on your RefTown profile's email address or cell phone number fields. Once you have the email address or phone number entered in your profile as an email address or phone number, you will then be able to choose that number/email as the PayPal/Venmo account ID. To make any of these changes to your profile, click your name in the top right corner and then click "Profile". On the Profile page, you'll find all of the necessary links to update your phone numbers, emails, or PayPal/Venmo preferences. | ||
Making sure games are correctly entered so that your officials can get paid by PayPal/Venmo | ||
| Article ID:279 | Posted:8/26/2021 3:07:35 PM | Updated:8/26/2021 3:33:13 PM |
| ||
Preparing for and Requesting Generation of 1099s | ||
| Article ID:253 | Posted:12/20/2020 12:31:46 PM | Updated:12/20/2023 5:21:12 PM |
To check your account for 1099 readiness:
| ||
1099 Generation & Distribution | ||
| Article ID:203 | Posted:1/8/2014 8:06:47 PM | Updated:2/24/2022 2:54:40 PM |
RefTown offers the option of generating 1099's. This includes electronic distribution your officials as well as electronic filing with the IRS and most states. 1099 GENERATION Once your data is complete and we are notified, we will typically generate your 1099s within 1 to 2 days. Once we have generated your 1099s, they will be posted to your account as follows:
All PDF files are individually encrypted and password protected. The password for an individual official's 1099 is the officials SSN (or TIN)...digits only, no dashes. The password for the All-in-one PDFs will be a randomly generated set of characters that will be provided directly to those that need access to those files. 1099 DISTRIBUTION Once we have generated the 1099s for your officials, we will post the encrypted PDF file on Reftown for access by each official. We will also email a copy of the 1099 to the email address on file. Each official can access their 1099 on Reftown at any time:
1099 FOLLOWUP Periodically, it is recommended to send out reminders through Reftown to those who have not yet confirmed receipt. The system provides an email function on the 1099 management page to do exactly that. It will only send the notice to those who have not yet confirmed receipt. For those who have not confirmed near the end of January, it is required by the IRS that you print and mail paper copies by January 31st. The All-in-one file with 1 official per page is designed for this purpose. When printing, you can either print the entire file or select specific pages to be printed. Near the middle to end of January, we will electronically file all 1099s with the IRS and most state agencies, including:
We will provide a confirmation to you once we have filed your 1099s with the IRS. | ||
Preparing Your Organization, Invoices, and Officials for 1099 Processing | ||
| Article ID:205 | Posted:1/8/2014 9:58:42 PM | Updated:1/5/2021 12:56:23 AM |
Preparing and/or Verify your Organization's Account for 1099 processing
Preparing Invoices to be Included in 1099 Processing
Preparing officials for inclusion in 1099 Processing
OR
This will generate a summary of which batches are being included in the totals. It will also generate a report of:
For officials without a valid SSN/Tax ID, the report will include a link where you can edit the official's account to add an SSN or Tax ID. | ||
1099 Generation and Distribution Process | ||
| Article ID:208 | Posted:1/5/2015 7:49:41 PM | Updated:12/21/2024 12:21:42 AM |
RefTown offers the option of generating 1099's. This includes electronic distribution your officials as well as electronic filing with the IRS and most states. 1099 REQUIREMENTS
1099 PREPARATION
1099 GENERATION Once your data is complete and we are notified, we will typically generate your 1099s within 1-3 days. Once we have generated your 1099s, they will be posted to your account as follows:
Per IRS regulations, all PDF files are individually encrypted and password protected. The password for an individual official's 1099 is the official's SSN (or TIN)...digits only, no dashes. The password for the All-in-one PDFs will be a randomly generated set of characters that will be provided directly to those that need access to those files. 1099 DISTRIBUTION Upon completion of the forms, we will email them to the officials.. 1099 IRS FILING In late January, we will then file your 1099's with the IRS and (through the IRS) with the respective states. We will provide a confirmation to you once we have filed your 1099s with the IRS. | ||
W9 Collection and Management | ||
| Article ID:263 | Posted:1/5/2021 1:29:18 AM | Updated:1/5/2021 1:29:18 AM |
As a substitute for paper W9's, the IRS authorizes electronic versions that collect the same information as the paper forms. Organizations can enable this feature under Admin -> Configuration - Finances, Payments, W9 Setup Once configured, you can view a report of the status of the officials' W9's under Pay -> Officials SSN and W9 Management. While this report does not show you an officials SSN, it does indicate if they have one, if they have a W9, if the W9 information matches what is now on the roster (in case of an address change), and if the officials name is a match for the provided SSN (according to the IRS). | ||
Printing 1099's | ||
| Article ID:289 | Posted:2/24/2022 2:59:19 PM | Updated:2/24/2022 3:02:56 PM |
In the event you need to print 1099's for one or more of your official, you have two options:
| ||
What happens when an officials direct deposit can't be made due to a closed or invalid account | ||
| Article ID:220 | Posted:10/16/2016 12:20:54 AM | Updated:6/15/2022 2:45:15 PM |
Occasionally, direct deposits can not be completed. This can happen when an official provides an incorrect routing number or account number. This can also occur when an account is closed. When that occurs,
| ||
Electronic Payments / Direct Deposits | ||
| Article ID:189 | Posted:9/13/2011 12:29:27 AM | Updated:3/20/2025 8:13:37 AM |
RefTown, in combination with KotaPay, offers an optional direct deposit service that is integrated with our financial invoicing features. Once an invoice is created, it is only a couple additional steps to make the payments directly to your officials accounts. Officials can enter their checking account information into RefTown under their account profile. The complete account numbers will not be displayed back to the official or an administrator of the organization...only partial account numbers. The entered routing number will be validated against legal routing numbers. Due to the pattern rules of valid routing numbers, single digit typos can be detected and rejected. Account numbers have no specific pattern that can be checked. Officials will be asked to enter their account number twice to greatly reduce the risk of an error. If the two numbers don't match, it will be rejected. Once officials have entered their direct deposit info, you can make direct deposits. High Level steps to make direct deposits are...
At this point the deposits will be submitted to our Banking partner and will be processed.
At no time will your organization's money ever be in an account operated by RefTown. All funds will be transferred directly from your bank account to KotaPay, a long established electronic funds processing operation that is powered by First International Bank & Trust, and then to your officials' bank accounts.
These transactions will be started through either a wire from your bank to KotaPay or an ACH transfer to KotaPay. A wire guarantees the funds to KotaPay and allows the payments to be made more quickly---next business day if the batch is submitted before the cutoff time. An ACH transfer is held until the fund clear before making payments.
All fees incurred as a result of submitting a batch will automatically be charged to the organization as an additional direct deposit from the account from which your direct deposit funds are also drawn. The overall cost per transaction can be cheaper than printing and mailing checks and is far more efficient.
This function requires that your organization enter a 3-way contract with KotaPay and RefTown allowing RefTown to facilitate electronic transactions initiated by you to be processed by KotaPay. | ||
Direct Deposits and/or PayPal/Venmo Payments from Game Payors (School/Teams) | ||
| Article ID:291 | Posted:4/1/2022 9:33:24 PM | Updated:4/1/2022 9:33:24 PM |
In some areas, the schools/teams are responsible for making payment to the officials. RefTown offers a service to those organizations for making payments. This process for schools/teams to make payments is practically identical to the process used when officials organizations make payments. 1. A representative of the paying entity (school, district, coach, etc.) processes a select set of games to create an "invoice" (aka, paysheet). 2. The representative will execute payments using either direct deposit (directly to the official's designated checking/savings account) or through PayPal/Venmo. There is no cost to the official for receiving payment through this method. The paying entity bears all of the costs. What does the officiating organization need to do? If you already have the system set up to show game fees...nothing. There will be some options enabled that put reminders to sign up for direct deposit on the officials' home pages. Just leave those enabled so your officials can access the signup. | ||
Configuring Reftown for the TASO Ring + Portal Mileage System | ||
| Article ID:214 | Posted:10/13/2016 3:30:45 AM | Updated:8/1/2025 9:07:18 PM |
There are several steps to getting this right, but it is a onetime configuration:
| ||


Mileage Calculations | ||
| Article ID:179 | Posted:1/6/2010 10:11:25 PM | Updated:6/22/2010 12:32:56 PM |
Mileage is calculated through several parts that come together to generate the mileage. The mileage calculation, if enabled, normally starts with the mileage/adjustment set as specified on the fee tables. If the matching mileage/adjustment set has specified that mileage should be calculated, the school/team roster is checked for a distance. The mileage/adjustment set is then referenced for how much to pay per mile, how much to limit the total to (maximum and/or minimum), whether to pay by round trip, and whether to pay more than one mileage per date per location. | ||
Driving Distance Methods | ||
| Article ID:228 | Posted:6/14/2017 10:40:49 PM | Updated:7/24/2025 8:00:01 PM |
RefTown supports to modes of driving distances. The first and default method uses an approximated distanced based on latitude and longitude derived from officials and location addresses. The latitude and longitude of each official and location is stored on RefTown and an equation is used to calculate the line-of-site distance between the two points. That distance is then padded about 20% to account for the fact that the roads are rarely that direct. This number is generally good enough when identifying officials closer or farther from a given game location. This method would be insufficient in the presence of rivers, lakes, mountains or other obstacles that lead to longer driving distances despite the fact that the two locations are not that far apart or when the route might be very straight. RefTown, also supports a mode that actually queries Google Maps for the actual route between the official's location and the game's location. This provides a very accurate driving distance. This is much more complicated and resource intensive than the simple latitude/longitude calculations but it will be accurate if the addresses in the system are correct and accurate. Enabling this mode also allows for drive time estimations in addition to distance. THE FOLLOWING OPTION IS NO LONGER AVAILABLE. WE ARE WORKING ON A REPLACEMENT. Note that the first accesses after entering this key to pages that reference driving distances will be very slow as the distances are calculated. Depending on the number of officials and locations your organization has, the first accesses may be extremely slow. However, subsequent accesses will process at typical speeds. | ||
Setting up Reftown and Google Maps for Precise Driving Distances | ||
| Article ID:328 | Posted:7/24/2025 8:00:07 PM | Updated:7/25/2025 10:47:18 AM |
This is used to set up Reftown for calculating precise driving distances related to assignments. Logging Into a Google Cloud Account
Creating a Google Cloud API Key for Driving Distances After logging into the Google account as described above, execute the following steps to create your Google Maps key.
Applying the Key for Use on Reftown. After creating the API key on the Google Cloud Console, you will then need to copy the key and paste it into the Reftown configuration pages.
NOTE: It is possible that at the time of a new setup, an organization might incur a sizable expense from Google when a large number of distances need to be calculated....from all officials to a large number of location locations. | ||
Setting up Reftown to Accept Stripe Payments | ||
| Article ID:323 | Posted:10/8/2024 10:49:24 AM | Updated:1/12/2025 4:33:04 PM |
Reftown can be configured to accept stripe payments for your organization.
| ||
How does the ballot/voting/quiz system work? | ||
| Article ID:143 | Posted:10/14/2008 9:09:19 AM | Updated:2/28/2017 11:41:04 PM |
� The Reftown Ballot/Signup system provides a secure, independent method of collecting votes for various purposes. � The system remembers who has voted and when. It will not permit a revote by the same individual. � The details of a submitted ballot are not available to anyone else in your organization.
� Once votes are cast, removing options is not permitted or supported—that would corrupt the votes already cast. � A voter can confirm that the voter’s own ballot was received by returning to the ballot—the time and date of the submission will be displayed with a notice that the voter can not vote again. � Like game assignments, ballots/signups remain invisible to the members until published. � Ballots/signups open and close automatically based on the dates entered. Once a ballot/signup opens, changes are not permitted. | ||
What is the difference between a Ballot and a Signup and an Exam/Quiz? | ||
| Article ID:140 | Posted:10/14/2008 8:27:34 AM | Updated:11/16/2010 12:55:59 AM |
They are the same in nearly every way. The ballot is a "secret" ballot system. No one has access to the details of the ballot submissions. Depending on options selected, administrators of the ballot may be able to see a list of who has submitted a ballot (but, again, not thier choices). The option selected will be shown on the ballot. The signup is much like the ballot except that the administrators can see the details of the submissions....who selected what. The quiz/exam allows you toenter a "correct" answer and will generate a % correct score.
| ||
How do I configure a new or existing ballot/signup/quiz? | ||
| Article ID:141 | Posted:10/14/2008 8:45:57 AM | Updated:1/14/2021 8:08:29 PM |
| ||
How do I add/edit questions on a ballot/signup? | ||
| Article ID:142 | Posted:10/14/2008 8:58:48 AM | Updated:8/28/2016 8:26:37 PM |
|
ADDING QUESTIONS
CONFIGURING OPTIONS FOR SELECTION LISTS
FINAL STEPS
| ||
How do the instant run-off elections work? | ||
| Article ID:144 | Posted:10/14/2008 9:24:32 AM | Updated:6/22/2010 11:53:09 AM |
The instant runoff voting tabulates votes based on the principle that any vote cast for a last-place candidate shall be transferred to the next-choice candidate on that ballot until one candidate has a majority of votes. This ballot-count method duplicates what would occur if all voters participated in a graduated series of runoff elections. Vote counting shall start with a tabulation of first-choice votes. If a candidate receives a majority of the first-choice votes, then that candidate shall be declared elected. If no candidate receives such a majority, then the candidate with the fewest first choices shall be declared defeated. Ballots cast for this defeated candidate shall be transferred at full value to the next-choice candidate marked on each ballot. Last-place candidates are eliminated and their supporters' ballots transferred to next-choice candidates who are still in the race in a similar manner until a candidate receives a majority of votes that have not been exhausted. If a ballot has no more available choices ranked on it, that ballot shall be declared "exhausted." If there are two candidates with fewest number of first place votes, the number of second-place votes are included. If that still doesn't break the tie, third-place votes are included, and so on. It's still possible, but highly unlikely, that there will still be a tie. Example: 4 candidates, 50 voters A: 22 first-place votes B: 16 first-place votes C: 6 first-place votes D: 6 first-place votes No candidate has a majority of the first-place votes. This voting method drops the one with the fewest votes. In this case, there are two. Which one to declare defeated? Since they have the same number of first place votes, the second-place votes for those two are considered for the tie-breaker. C: 10 second-place votes D: 13 second-place votes C is eliminated and D remains. The 6 ballots that have C as their first choice are referenced for their second choice (they be come first choice votes now that C is no longer in the race, the 3rd place votes become 2nd, etc.) Of those six votes, two have A second, and 4 have B second. That gives the following: A: 24 first place votes B: 20 first place votes D: 6 first place votes Still no majority. D is alone in last place, so D is eliminated. The 6 ballots that have D as their first choice are referenced for their second choice. Those votes are added to A and B. One of them will now have a majority or there will be a tie. If there is still a tie, the one with the greater number of first place votes in the prior round is declared the winner—having more natural first place votes. | ||
Signup Auto-Invoicing | ||
| Article ID:283 | Posted:10/26/2021 10:39:20 PM | Updated:10/26/2021 10:39:20 PM |
This feature allows you to create custom invoice items automatically based on the selections made as part of a signup/survey. To use this feature...
| ||
How does an administrator add or edit custom page content? | ||
| Article ID:36 | Posted:4/25/2007 8:00:19 PM | Updated:11/6/2014 9:52:02 PM |
There are 3 regions on nearly every page where you can add your own freeform content:
To add fully customizable information to a page, click on the menu labeled "Custom" then "Customize this Page." A page will open where you can select the area of the page to add to or and item to edit or delete. On the editing screen, you will be presented with a full featured editor that allows extensive page formatting: fonts, colors, tables, etc. You will have several options that control who can see the custom content and when it apears. After editing the content, click "Update Custom Header" to save the changes. Hover your mouse over the Editing Tips: To add a link to another page or document:
| ||
Can I add my own custom pages to RefTown? | ||
| Article ID:37 | Posted:4/25/2007 8:06:00 PM | Updated:6/21/2010 10:59:52 PM |
Yes, you can add complete pages to RefTown. To do so, click the "Custom" menu then select "Add Custom Page." A page will open with a full-featured editor that allows extensive page formatting: fonts, colors, tables, etc. You may make the pages accessible only to officials, or you may also allow schools and/or the public to access the new pages by checking the appropriate boxes. Give each page a "Menu Title" (the name that will appear in the menus) and a "Page Title" (the name that will appear at the top of the page once opened). Create the content. After editing the content, click "Update This Item" to save the changes. The added pages can be reached through the "Custom" menu by the "Menu Title." | ||
How do I add documents or document categories/folders to RefTown? | ||
| Article ID:44 | Posted:4/25/2007 8:43:32 PM | Updated:11/6/2014 9:45:05 PM |
Add new Documents:
Add new Document Categories/Folders:
Reference Uploaded Documents for use in Other Places
| ||
How do I change the name, category or permissions of a document? | ||
| Article ID:45 | Posted:4/25/2007 8:46:19 PM | Updated:6/21/2010 11:07:27 PM |
|
To modify the details of a document already on RefTown:
| ||
How do I edit a document that is posted on RefTown? | ||
| Article ID:46 | Posted:4/25/2007 8:48:21 PM | Updated:12/8/2013 11:34:25 PM |
Documents posted on RefTown cannot be directly edited. To change their content:
| ||
What types of documents are supported on RefTown? | ||||||||||||||||||||||||||||||||||||||
| Article ID:47 | Posted:4/25/2007 8:49:27 PM | Updated:4/16/2013 9:36:37 PM | ||||||||||||||||||||||||||||||||||||
| ||||||||||||||||||||||||||||||||||||||
How do I link to a document posted on RefTown from either inside of RefTown or outside? | ||
| Article ID:201 | Posted:12/8/2013 11:33:22 PM | Updated:12/8/2013 11:33:22 PM |
To create a link to a document posted on your documents page,
Paste the above copied address/url into the desitnation location. If the destination location is a custom text area within RefTown:
| ||
What do the various admin/assignor symbols mean? | |||||||||||||||||||||||||||||||||||||||||||||||||||||||||||||||||||||||||||||||||||||||||||||||
| Article ID:175 | Posted:12/27/2009 1:41:10 AM | Updated:4/16/2013 9:36:37 PM | |||||||||||||||||||||||||||||||||||||||||||||||||||||||||||||||||||||||||||||||||||||||||||||
| |||||||||||||||||||||||||||||||||||||||||||||||||||||||||||||||||||||||||||||||||||||||||||||||
Why does an officials prior response get cleared when part of the crew is changed? | ||
| Article ID:72 | Posted:5/8/2007 1:57:30 PM | Updated:6/21/2010 11:32:13 PM |
Be default, RefTown is set to require a new response from every crew member when part of the crew is changed. This ensures that all members of the crew have the most current information. This function can be disabled to require a new response only from officials directly affected by the change (i.e., the official added or removed). | ||
How do I set RefTown to not clear a official's prior response when there is a crew change? | ||
| Article ID:73 | Posted:5/8/2007 2:03:14 PM | Updated:6/21/2010 11:32:35 PM |
Go to:
and uncheck "Require Official Response on Crew Change." "Require Official Response on Crew Change ". | ||
Electronic Payments / Direct Deposits | ||
| Article ID:189 | Posted:9/13/2011 12:29:27 AM | Updated:3/20/2025 8:13:37 AM |
RefTown, in combination with KotaPay, offers an optional direct deposit service that is integrated with our financial invoicing features. Once an invoice is created, it is only a couple additional steps to make the payments directly to your officials accounts. Officials can enter their checking account information into RefTown under their account profile. The complete account numbers will not be displayed back to the official or an administrator of the organization...only partial account numbers. The entered routing number will be validated against legal routing numbers. Due to the pattern rules of valid routing numbers, single digit typos can be detected and rejected. Account numbers have no specific pattern that can be checked. Officials will be asked to enter their account number twice to greatly reduce the risk of an error. If the two numbers don't match, it will be rejected. Once officials have entered their direct deposit info, you can make direct deposits. High Level steps to make direct deposits are...
At this point the deposits will be submitted to our Banking partner and will be processed.
At no time will your organization's money ever be in an account operated by RefTown. All funds will be transferred directly from your bank account to KotaPay, a long established electronic funds processing operation that is powered by First International Bank & Trust, and then to your officials' bank accounts.
These transactions will be started through either a wire from your bank to KotaPay or an ACH transfer to KotaPay. A wire guarantees the funds to KotaPay and allows the payments to be made more quickly---next business day if the batch is submitted before the cutoff time. An ACH transfer is held until the fund clear before making payments.
All fees incurred as a result of submitting a batch will automatically be charged to the organization as an additional direct deposit from the account from which your direct deposit funds are also drawn. The overall cost per transaction can be cheaper than printing and mailing checks and is far more efficient.
This function requires that your organization enter a 3-way contract with KotaPay and RefTown allowing RefTown to facilitate electronic transactions initiated by you to be processed by KotaPay. | ||
How to Create an Invoice | ||
| Article ID:155 | Posted:6/10/2009 12:48:27 AM | Updated:6/15/2022 2:47:30 PM |
Assuming the invoice functions are enabled under the configuration options:
| ||
School/Team Administrator Simplified Invoice Creation Process | ||
| Article ID:297 | Posted:6/15/2022 3:32:16 PM | Updated:8/1/2025 9:14:10 PM |
While School/Team administrators can follow the standard invoicing procedure outlined in other articles, they also have some aids available to them that are not available to officials organizations that pay the officials internally.
That notice will look something like this:
It tells you
To create invoices for the uninvoiced games....
You will then see the a set of buttons that will take you to the related invoices.
Continue with the payment instructions under https://www.reftown.com/kbp/index.php?View=entry&EntryID=189 | ||

Tracking Payment Status of Invoices | ||
| Article ID:255 | Posted:1/3/2021 11:37:29 PM | Updated:6/15/2022 2:43:47 PM |
There are a few options for manually tracking invoice payment status. One option is very simple and meant to track paid or not paid, the others are a little bit more involved and allow you to enter check numbers and more. Note, this is NOT used when using our Direct Deposit or other automated payment function. This is only meant to be used to track payments made outside of Reftown. The simple methods use a payment type of "Other" and the current date for the payment date. The detailed method allows you to choose a payment method, payment date, and a payment #. First, locate the invoices of interest (not, not all methods are available to school/team administrators):
Simple Method from a Listing of Invoices
Simple Method from within a Single Invoice
Detailed Method from a Listing of Invoices
Detailed Method from a Listing of Invoices
| ||
What happens when an officials direct deposit can't be made due to a closed or invalid account | ||
| Article ID:220 | Posted:10/16/2016 12:20:54 AM | Updated:6/15/2022 2:45:15 PM |
Occasionally, direct deposits can not be completed. This can happen when an official provides an incorrect routing number or account number. This can also occur when an account is closed. When that occurs,
| ||
How do schools request games on RefTown? | ||
| Article ID:42 | Posted:4/25/2007 8:26:40 PM | Updated:9/17/2024 12:38:12 PM |
Go to "Schedules" -> "Game Request" (only available to schools and assignors). The interface for schools is the same as the assignor's interface (see the related article). The only difference is that the games requested by schools do not go directly to the schedule but into a requested games list where the assignor can choose to put them on the schedule or can delete the request. To enable this feature, go to:
| ||
How does text messaging work on RefTown? | ||
| Article ID:325 | Posted:11/21/2024 12:20:11 AM | Updated:11/21/2024 12:20:11 AM |
Text messages can be sent to officials with games assignments and game changes if the official has enabled that option on their profile. Officials can also enable their account to receive text messages accompanying general email messages. These options are both in the hands of each official. This is required by FCC regulations. If an official opts out of receiving them by sending a "STOP" message in response to a received message, you cannot turn them back on. If you do, and a message is subsequently sent, our provider will reject the message and notify us to stop sending messages to that number. We are required by FCC regulations, in response to that message, to disable the sending of messages to that account. Only the official can restore the sending of such messages by sending a "START" message back to our text message number. How Messages are Counted: | ||